This post may contain affiliate links. Read my privacy policy.
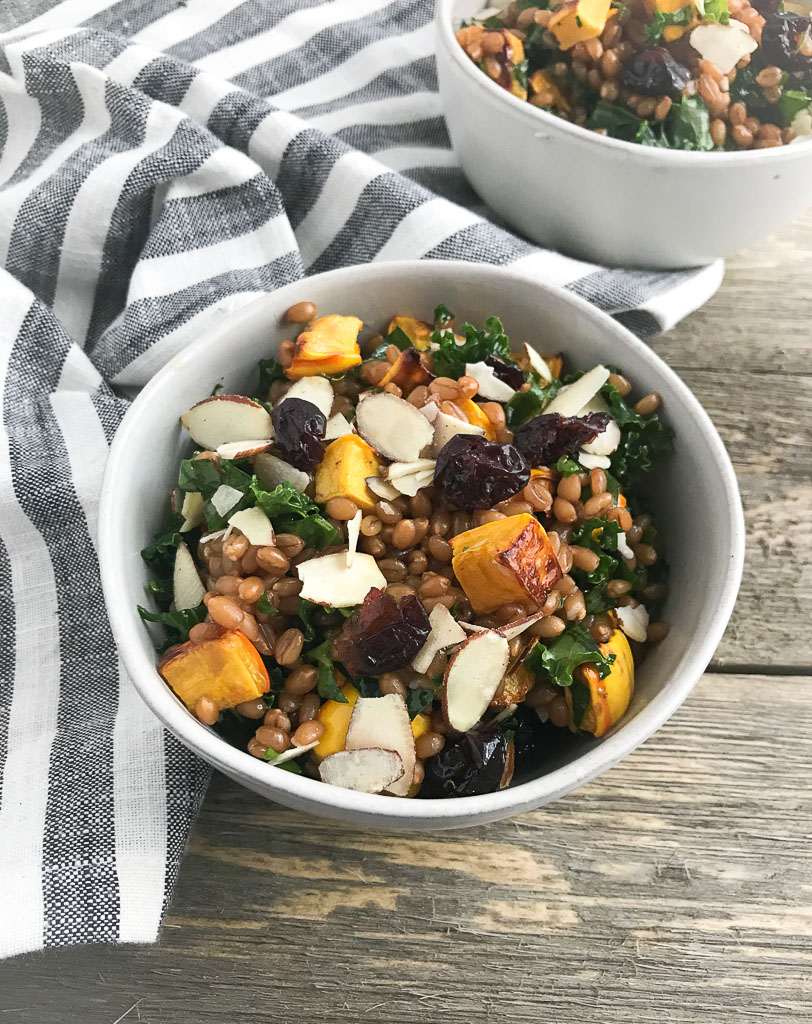
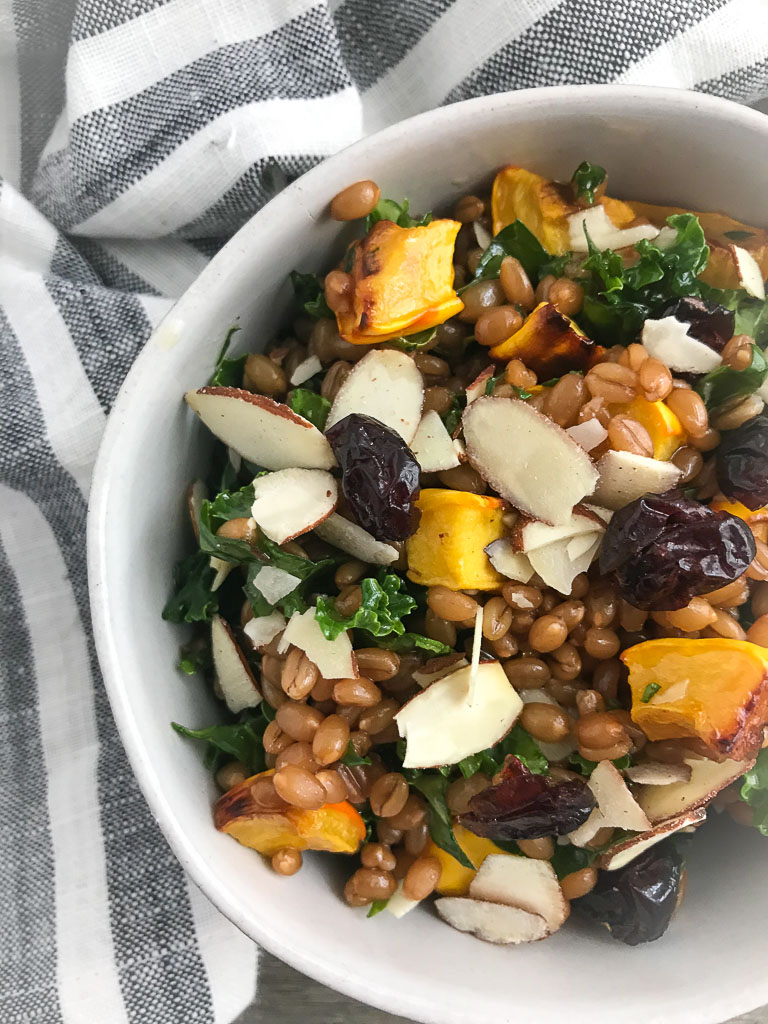
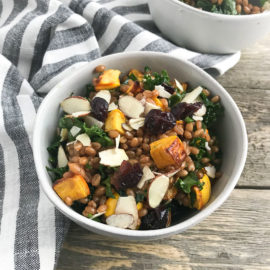
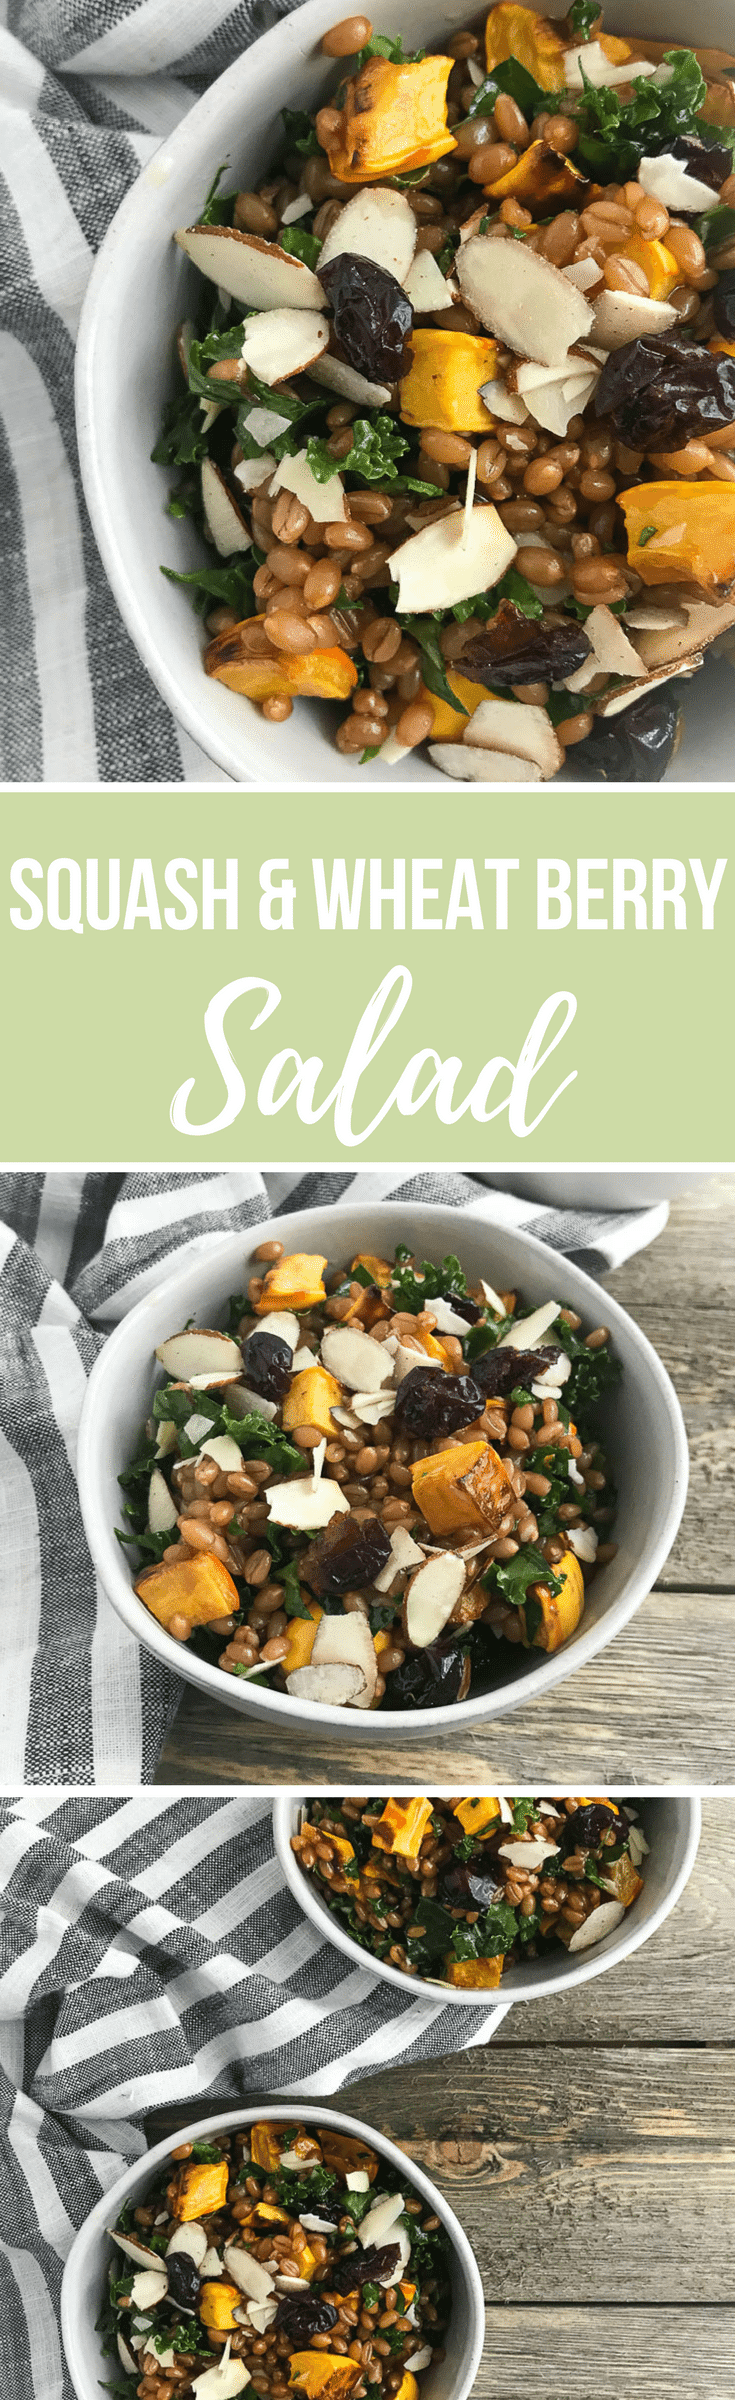
This Squash & Wheat Berry Salad captures all the different flavors of sweet, savory, tart, and nutty. Batch cook for the week for a satisfying meal or side dish.
One of my meal prep strategies is batch cooking at least one whole grain for the week. Then that whole grain is incorporated throughout the week in various ways.
I’ve been utilizing my Instant Pot to quickly batch cook grains for my weekly meal prep. Wheat berries can take up to an hour to cook and require you to keep a constant eye on them. Throw them into the Instant Pot and voila – done in half the time!
I’ve had a little extra time on my hands this week being completely snowed in the past two days. With an already prepped batch of wheat berries in my fridge, I utilized the ingredients in my kitchen to create this dish.
I feel like many of my recipes are like I am a contestant on Chopped. The items that are in my kitchen are my “mystery basket”. I must say it is a much easier mystery basket than what the contestants end up with. Chopped viewers voted, mashed potatoes candies were voted the weirdest basket ingredient on the show. What even are those?!
Squash season is not over yet! I love using delicata squash because of its more tender flesh and skin, making this variety easier to work with. No need to even peel the skin!
You know I love making my own dressings. It’s SO easy. Want to create your own signature vinaigrette? Use my guide with your favorite flavor combination!
This Squash & Wheat Berry Salad captures all the different flavors of sweet, savory, tart, and nutty. Batch cook for the week for a satisfying meal or side dish.
Cook wheat berries according to package directions (or try my Instant Pot Wheat Berries recipe for a simple method). Let cool once cooked.
Preheat oven to 400 degrees F. Dice delicate squash. Toss with 1 tablespoon of olive oil and sprinkle with salt and pepper. Place on a baking sheet lined with parchment paper. Roast for 20-30 minutes, until squash is tender and caramelized, stirring occasionally.
In a mason jar, combine remaining 1 tablespoon of olive oil, orange zest, orange juice, and maple syrup. Secure the mason jar lid and vigorously shake. Season with salt and pepper, to taste.
In a large bowl, combine wheat berries, squash, kale, dried tart cherries, and sliced almond. Dress with salad dressing. Toss to combine.
This post may contain affiliate links. Read my privacy policy.
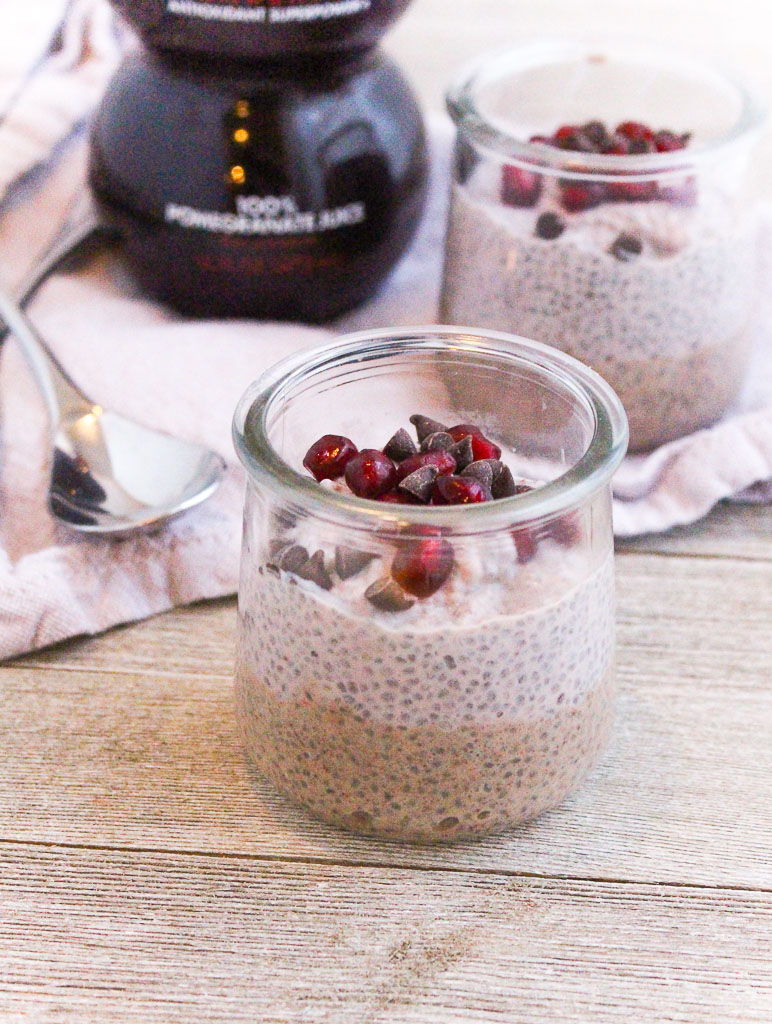
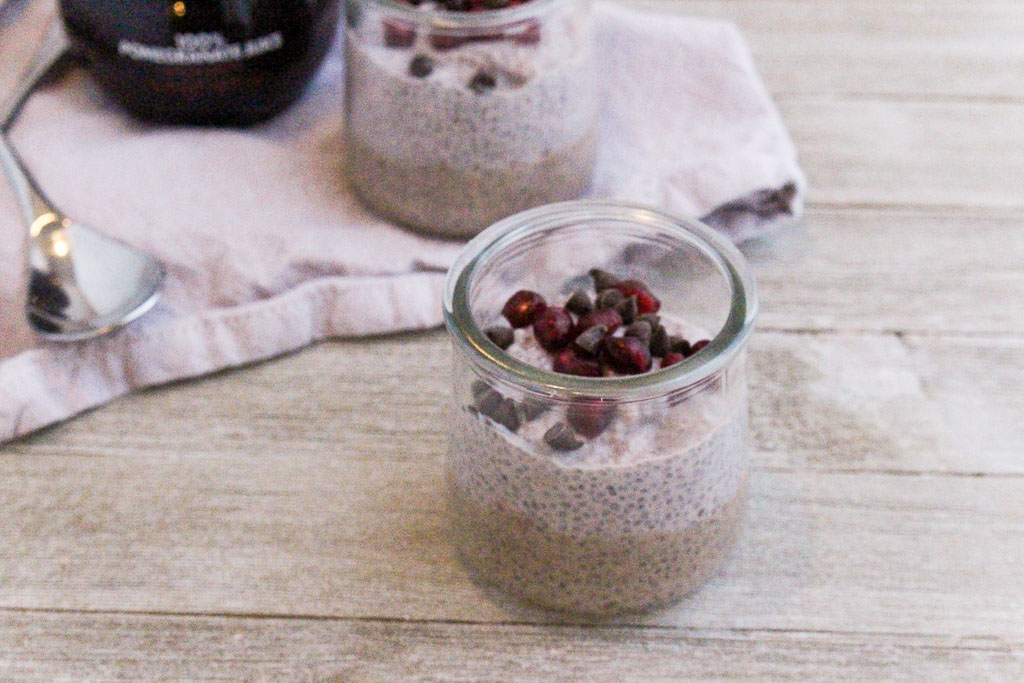
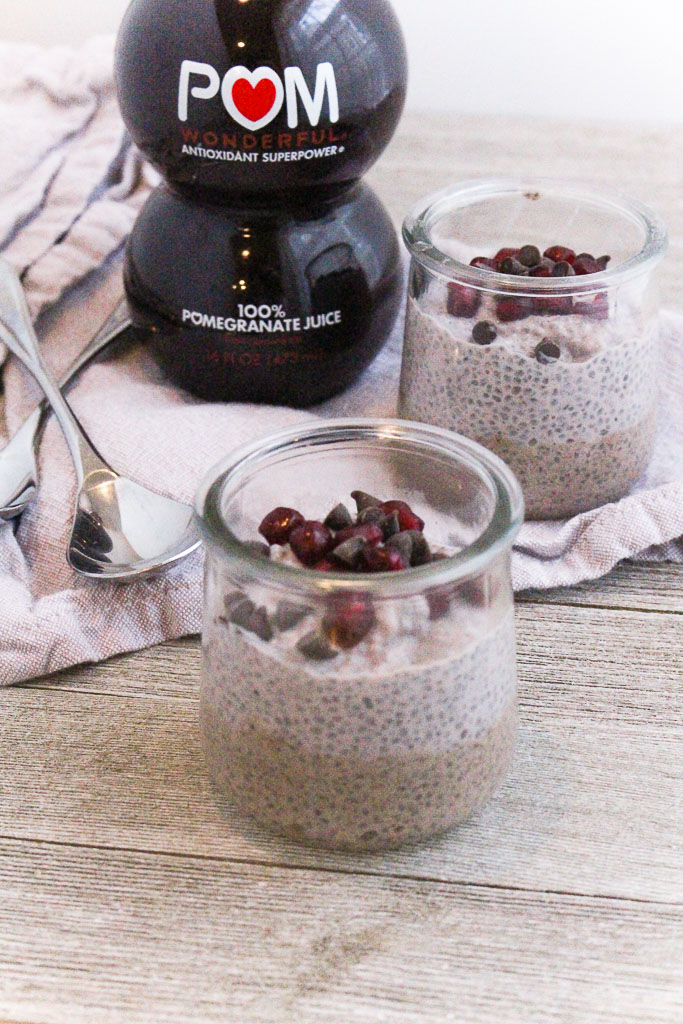
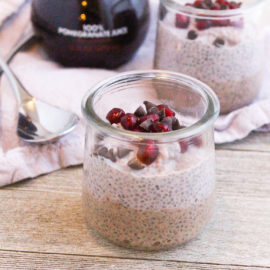
Not one, but two layers of delicious chia pudding. Have you ever tried using pomegranate juice to thicken your chia pudding? You will now because I know you’ll want to try this Layered Chocolate Pomegranate Chia Pudding. By posting this recipe I am entering a recipe contest sponsored by POM Wonderful and am eligible to win prizes associated with the contest. I was not compensated for my time.
Do you ever go through food phases? Chia pudding has been on constant repeat for me these past few weeks. I love that it’s easy to meal prep in advance for a quick (and satisfying) breakfast in the morning.
Plus, chia pudding is easy to customize with various flavors. Another food phase I’ve been into is pomegranates. It definitely helps that they are in season right now, so I am grabbing one every time I am at the grocery store.
When fresh pomegranates aren’t in season, I can still get my pomegranate fix with POM Wonderful 100% Juice.
POM Wonderful 100% Juice is powered by antioxidants. The pomegranate is whole-pressed, meaning a unique blend of polyphenol antioxidants from two whole pomegranates – including its fruit, pith, and rind – is found in each 8 oz bottle.
You can usually always find a bottle of POM Wonderful 100% Juice in my refrigerator. I love adding a splash of pomegranate juice to sparkling water for a fun fizzy drink.
I had fun partnering with POM Wonderful 100% Juice and The Recipe ReDux to create a recipe using pomegranate juice. With my current chia pudding food phase, this was the first idea that popped into my head. I’ve always made chia pudding with milk or non-dairy milk as the liquid, so I wanted to see if POM Wonderful 100% Juice would yield the same kind of pudding-like consistency.
It did! I wouldn’t be posting this recipe if it didn’t 😛
Not one, but two layers of delicious chia pudding. Have you ever tried using pomegranate juice to thicken your chia pudding? You will now because I know you’ll want to try this Layered Chocolate Pomegranate Chia Pudding.
Ingredients
Scale
Chocolate layer:
1/4 cups chia seeds
2 tablespoons Greek yogurt
1/2 cup milk (or non-dairy milk)
1 tablespoon maple syrup
2 tablespoons cocoa powder
Pomegranate layer:
1/4 cup chia seeds
2 tablespoons Greek yogurt
1/2 cup POM Wonderful 100% Pomegranate Juice
(Optional) toppings: mini chocolate chips. pomegranate arils
Instructions
Chocolate layer: In a small bowl, whisk together chia seeds, yogurt, milk, maple syrup, and cocoa powder. Cover and transfer to the refrigerate for 1 hour.
Pomegranate layer: In a small bowl, whisk together chia seeds, yogurt, and POM Wonderful 100% Pomegranate Juice. Cover and transfer to the refrigerate for 1 hour.
Assembly: Remove the chia puddings from the refrigerator. In 4 separate serving cups or containers, and 1/2 cup chocolate pudding to each cup. Add 1/2 cup pomegranate pudding on top to each cup. Top with mini chocolate chips and pomegranate arils, if desired.
Keywords: chia pudding
Recipe Card powered by
Be sure to also check out the other pomegranate-inspired recipes from fellow dietitians and food bloggers in this Recipe ReDux link-up. It’s the first and only recipe challenge founded by registered dietitians. Enjoy!
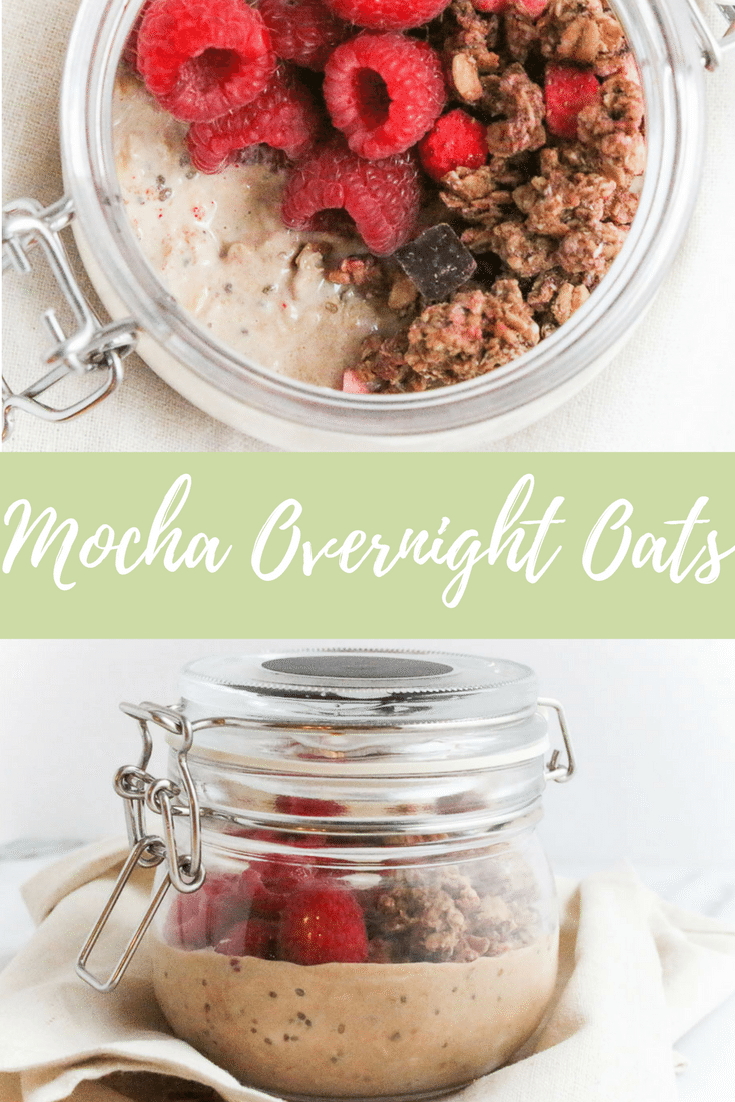
Prep breakfast the night before, so you can freely hit the snooze button the next morning. This Mocha Overnight Oats recipe will not only fill you up but also give you a little extra energy for the morning.
I used to be the person who never hit the snooze button. I would jump out of bed the second my alarm went off. I’ve gotten into the bad habit of staying up too late doing work. Sometimes I just get on a roll and keep working until my eyes can barely stay open. I know this is such a bad habit. I’m working on it..
This month’s Recipe Redux theme is “Grab a Book and Cook” which is a fun way to remake a recipe from your favorite cookbook. I grabbed my newest book from my collection for this month’s theme.
I love overnightoats. This new mocha overnight oats variation has become my new favorite! It is adapted from Lauren Harris-Pincus’ “The Protein-Packed Breakfast Club” cookbook.
About The Protein-Packed Breakfast Club:
The Protein-Packed Breakfast Club is filled with delicious, easy to make recipes containing 300 calories or less and packed with a minimum of 20 grams of protein. You’ll find a variety of recipes featuring dairy, protein powders, nuts, seeds, eggs and ancient grains including hot trends like overnight oats, smoothie bowls and mug cakes.
I never thought to add coffee to my overnight oats. This is genius! The little extra pick me up, plus the mocha flavor is a perfect way to start the day. The original recipe calls for the addition of coffee and chocolate protein powder, but I only had vanilla protein powder, so I added that plus a little cocoa powder to get that same mocha flavor.
Prep breakfast the night before, so you can freely hit the snooze button the next morning. This Mocha Overnight Oats recipe will not only fill you up but also give you a little extra energy for the morning.
This post may contain affiliate links. Read my privacy policy.
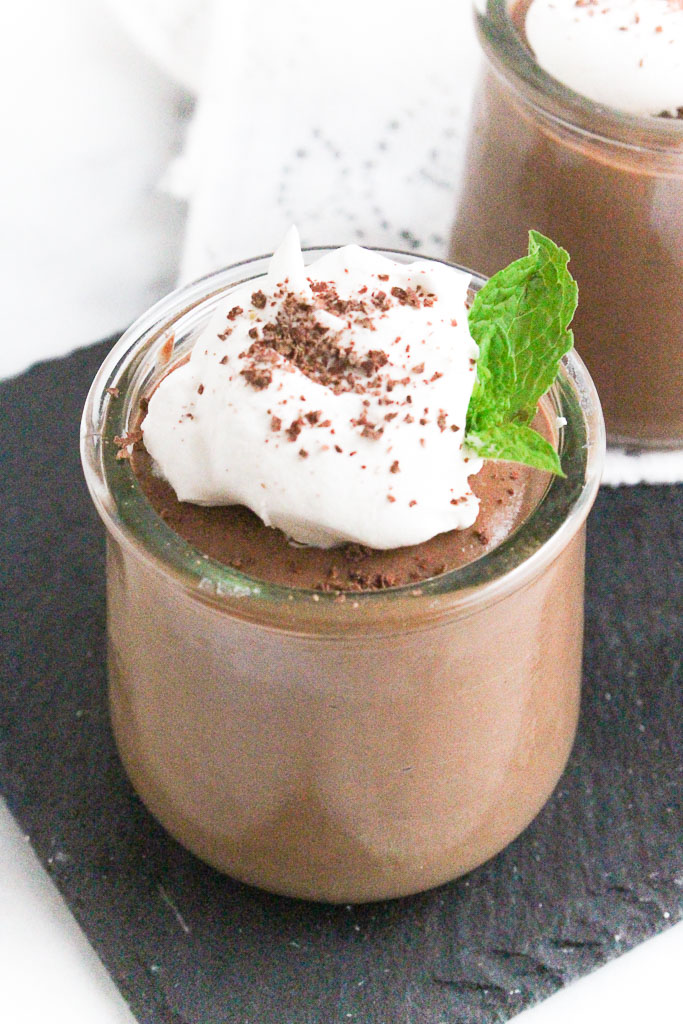
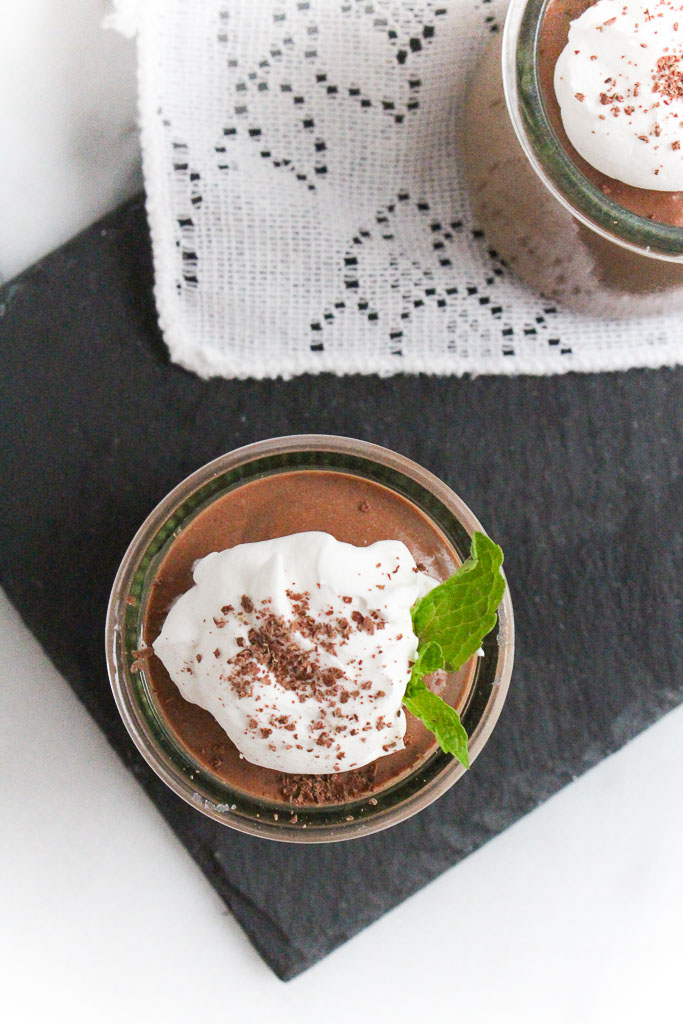
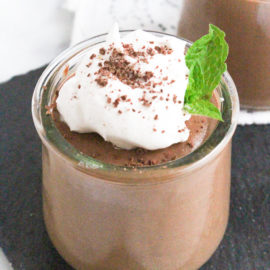
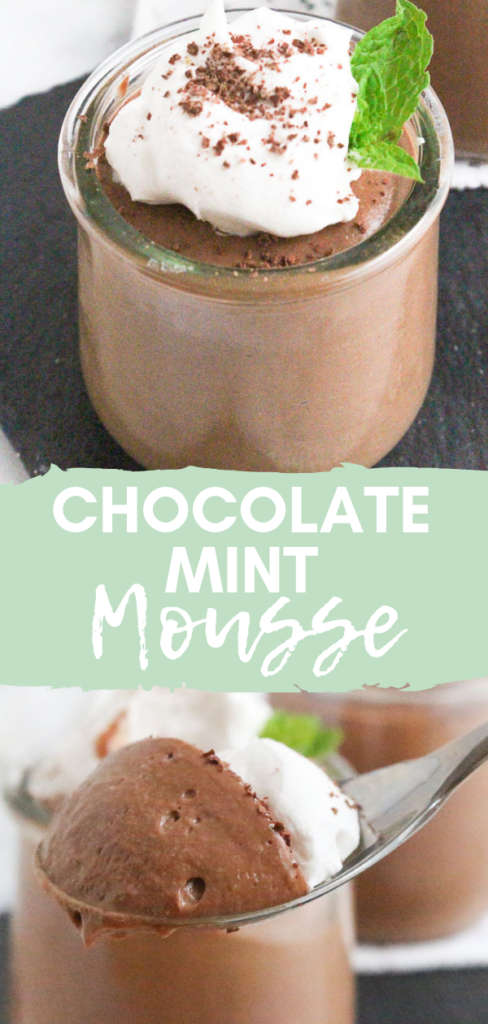
These perfectly portioned (vegan) Chocolate Mint Mousse desserts will satisfy your sweet tooth.
The great debate: Is it chocolate chip mint ice cream OR mint chocolate chip ice cream? Also, does it need to be green or is it okay being white? My family and I have discussed this in great lengths. We have different opinions, but one thing we can agree on is the love for the chocolate/mint combination.
Do you remember those Andes candies? Still, to this day, my mom put those in our Christmas stockings.
I repurposed the Oui yogurt glass containers for these perfectly portioned desserts. The secret ingredient that makes this silky and smooth vegan mousse – silken tofu!
Silken tofu is silkier than regular tofu, provides an incredibly delicate texture. That’s why it’s a natural fit in mousses and pies. Don’t worry, you would have no idea there is tofu in there. Tofu takes on the flavors of what else is in the recipe – in this case, chocolate mint!
I’m sure you knew that tofu is an excellent plant-based protein, but did you know tofu is also an excellent source of calcium? Calcium is not just found in dairy products, but also soy and dark leafy greens, which is important for bone health.
These perfectly portioned (vegan) Chocolate Mint Mousse desserts will satisfy your sweet tooth.
Ingredients
Scale
8 ounces dark chocolate, chopped
3 tablespoons maple syrup
1 teaspoon espresso powder
1 teaspoon mint extract
¼ teaspoon sea salt
2 cups (16 ounces) silken tofu (NOT soft tofu)
1 tablespoon water
Toppings: coconut whipped cream, shaved chocolate, mint leaves
Instructions
Melt the chocolate over a double boiler, or in a microwave-safe bowl. Remove the bowl from the heat as soon as the chocolate has melted, being careful not to burn it. Stir in the maple syrup, espresso powder, mint extract, and salt.
In a blender, combine the silken tofu, water, and melted chocolate. Blend until thoroughly combined.
Divide equally between 4 ramekins or little jars. Cover and refrigerate for at least 2 hours.
Top with coconut whipped cream, shaved chocolate, and mint leaves if using.
This post may contain affiliate links. Read my privacy policy.
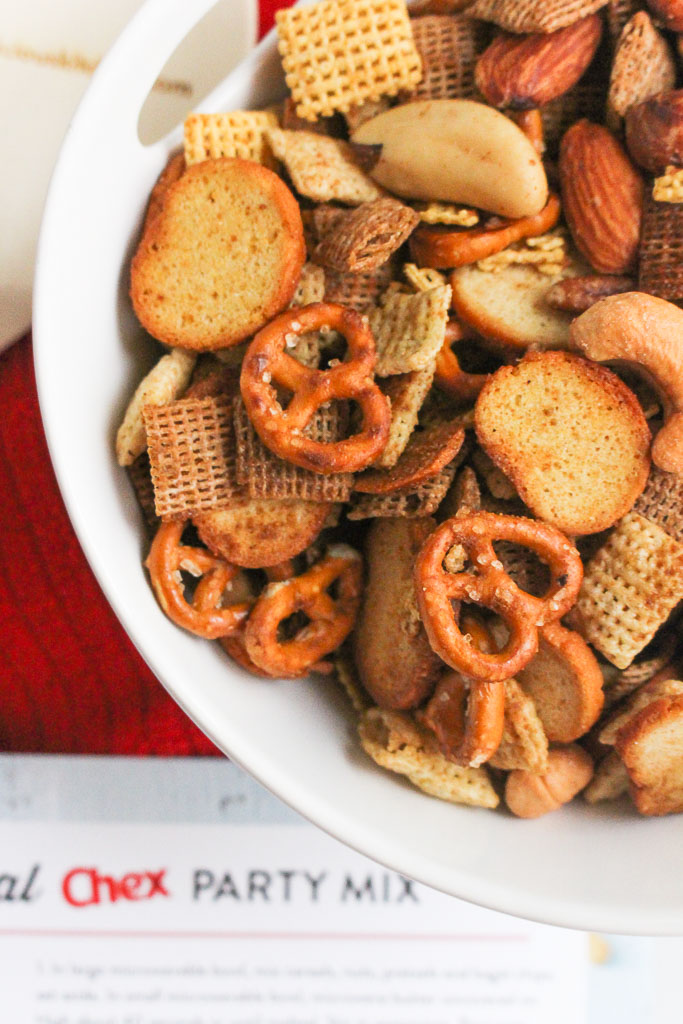
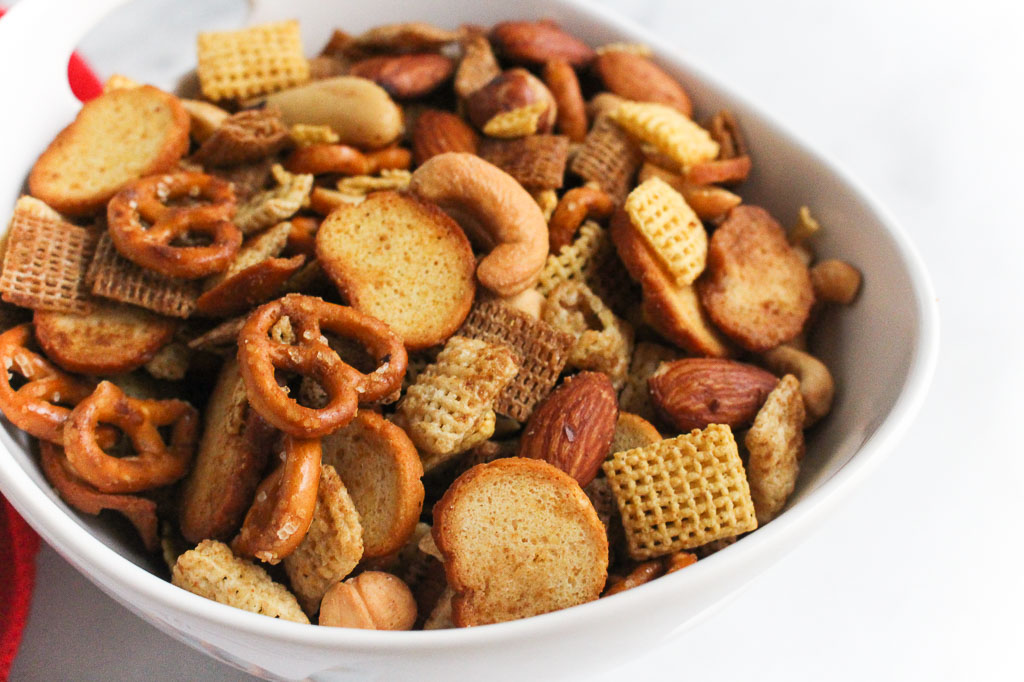
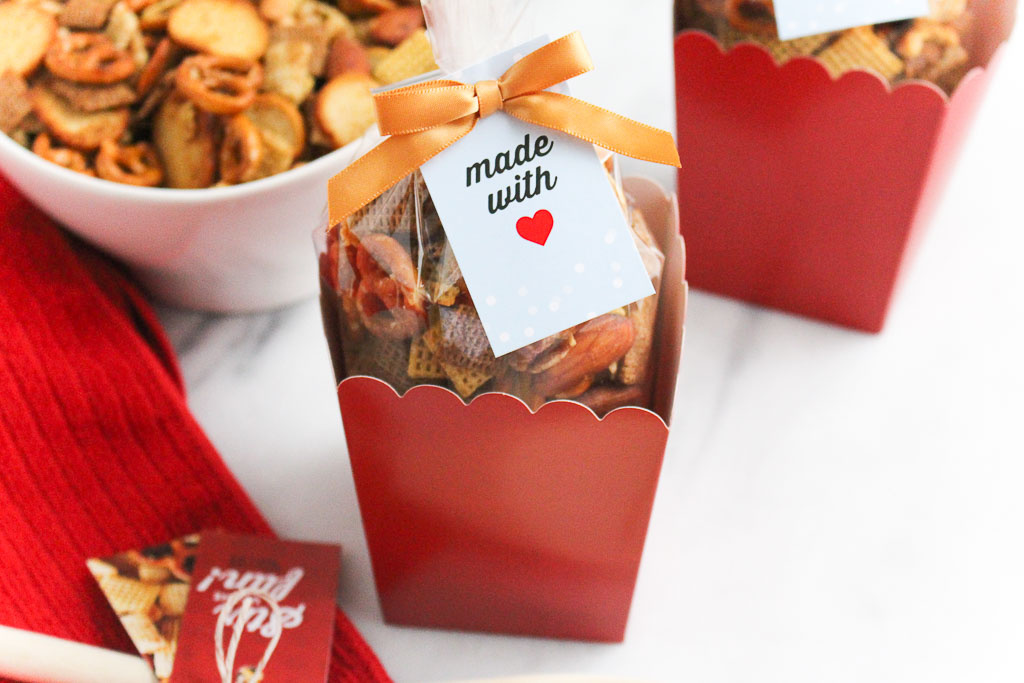
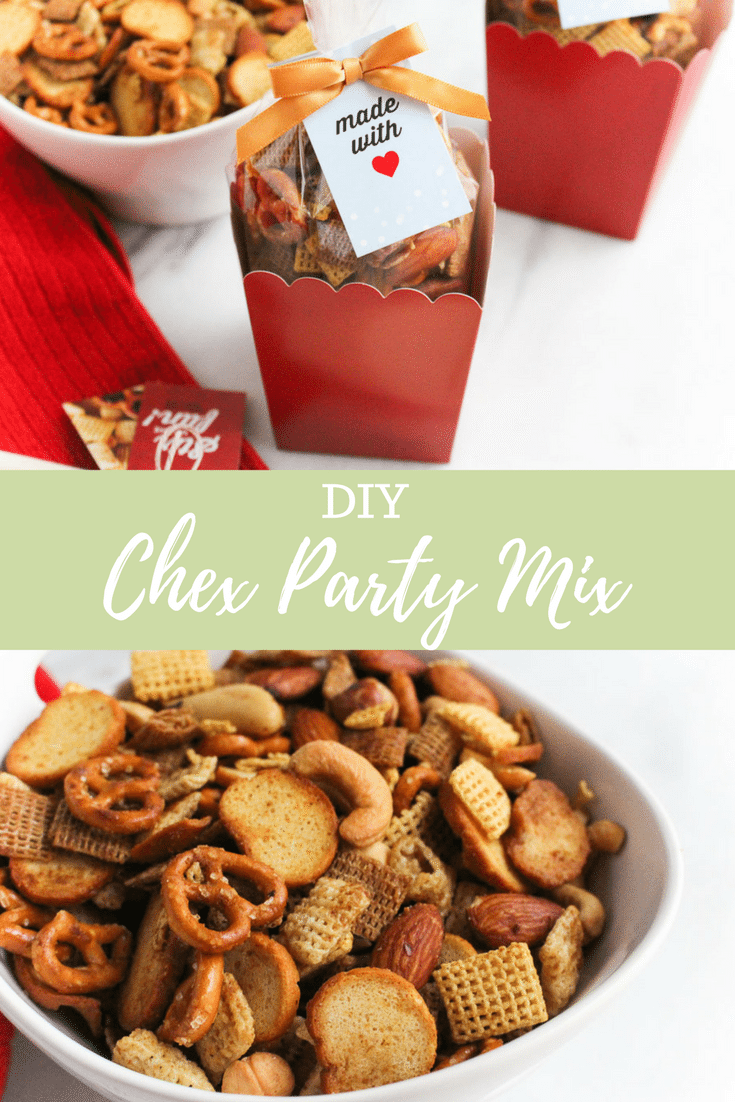
Spread the holiday cheer by sharing this DIY Chex Party Mix.
“The best way to spread Christmas cheer is singing loud for all to hear” .. name that movie!
Another great way to spread Christmas cheer is sharing a fun little snack with those around you this holiday season.
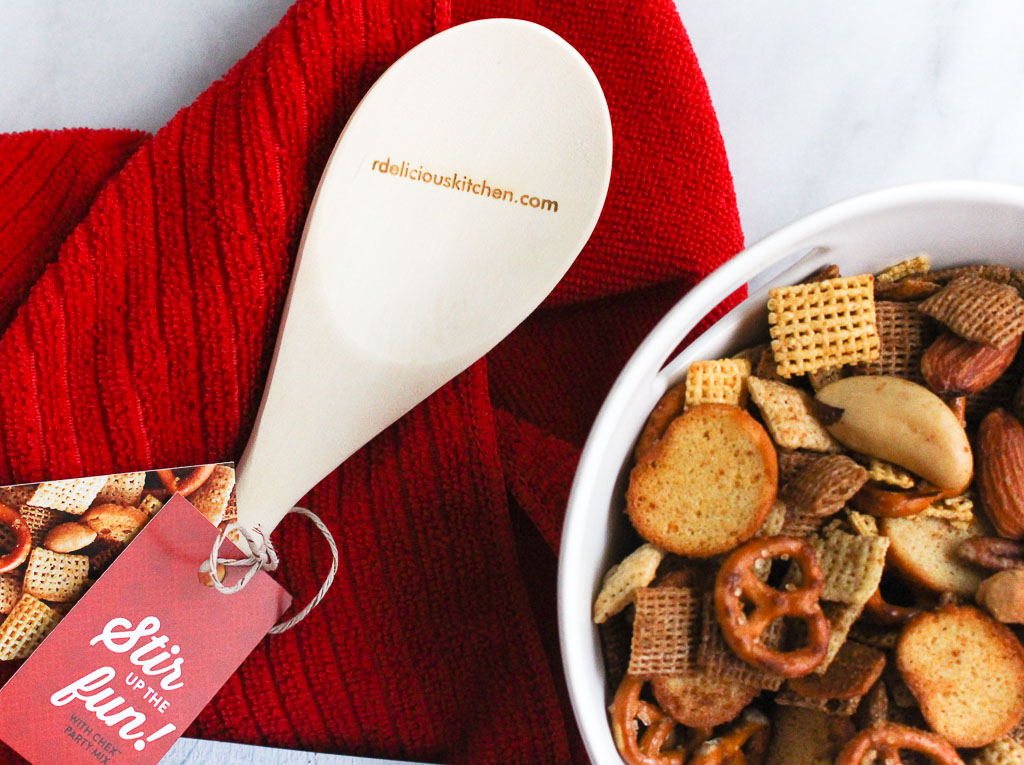
General Mills kindly sent me a care package to create Chex party mix to spread the holiday cheer. Look how adorable this personalized wooden spoon is!
Last month, I had a wonderful opportunity to spend a couple days at the General Mills headquarters learning all about General Mills and the Bell Institute of health, nutrition, and food safety.
General Mills and the Bell Institute of health, nutrition, and food safety truly stand behind their mission statement – serving the world by making food people love.
When I was there I cooked in the Betty Crocker test kitchen and learned she is a famous woman who never existed. Guys… Betty Crocker is NOT a real person! My mind was blown. The recipe creations they come up with in that kitchen are delicious. I tried a pumpkin spice cheerio latte AND a cinnamon toast crunch latte when I was there. The cereal was actually blended in to the beverage. So creative!
We even saw the behind the scenes of GM’s food photography studio where they take all of their photography for their recipes and the images that appear on the box’s products.
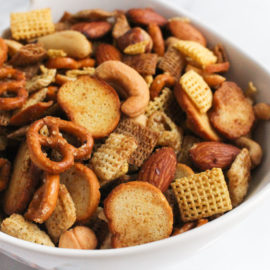
It was interesting to learn that each General Mills brand has their own unique story. Wheat Chex have always been a staple in my pantry. I love the crunchy texture. I often add it to my homemade trail mix.
It’s always so common to do a cookie swap or gift candies during the holiday season, but sometimes it feels like a sugar overload. This year I am packaging up this savory snack mix to pass out this year. I always like making something to pass out to everyone.
If you are still looking for a sweet treat, Chex has got ya covered with a recipe for that too – Muddy Buddies. In my house, we call this “puppy chow”.
Thank you, Chex, General Mills, and the Bell Institute to help make the holiday season a little brighter and cheery for everyone!
1 cup garlic-flavored bite-size bagel chips or regular-size bagel chips, broken into 1-inch pieces
6 tablespoons butter
2 tablespoons Worcestershire sauce
1 1/2 teaspoon seasoned salt
3/4 teaspoon garlic powder
1/2 teaspoon onion powder
Instructions
In a large microwavable bowl, mix cereals, nuts, pretzels, and bagel chips; set aside. In a small microwavable bowl, microwave butter uncovered on High about 40 seconds or until melted. Stir in seasonings. Pour over cereal mixture; stir until evenly coated.
Microwave uncovered on High 5 to 6 minutes, thoroughly stirring every 2 minutes. Spread on paper towels to cool. Store in airtight container. (OR Pre-heat oven to 250°. Put cereal and seasoning mixture into an ungreased roasting pan and bake for 1 hour, stirring every 15 minutes. Spread on paper towels to cool, about 15 minutes.)
Disclosure: I was provided with travel and accommodations to the General Mills for the #InsideGMI experience. I was not additionally compensated for my time or to write this post.
This post may contain affiliate links. Read my privacy policy.
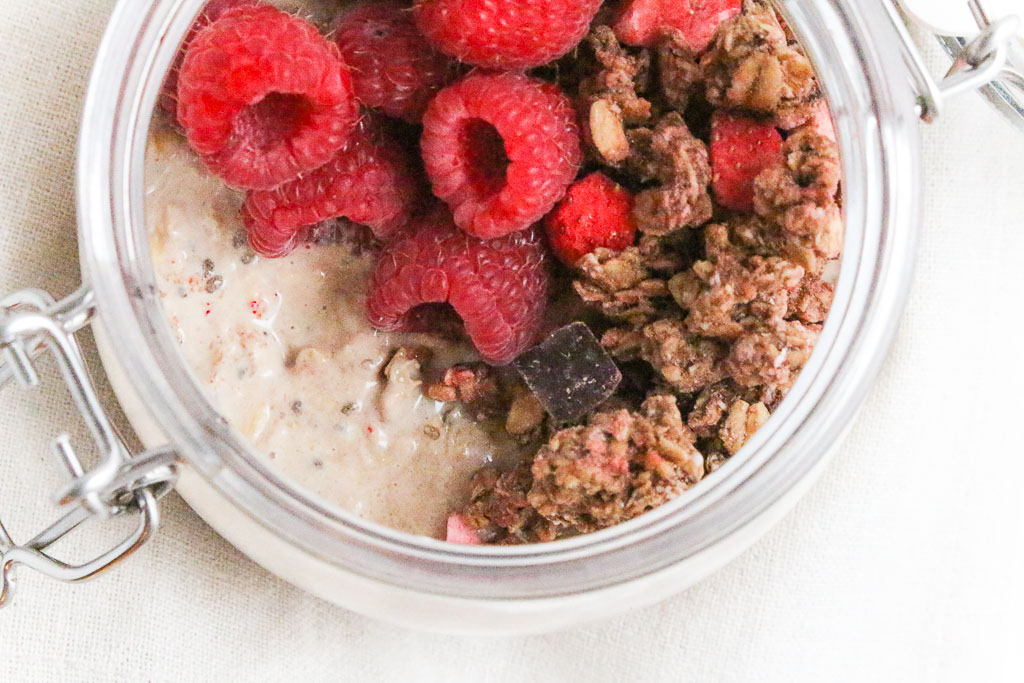
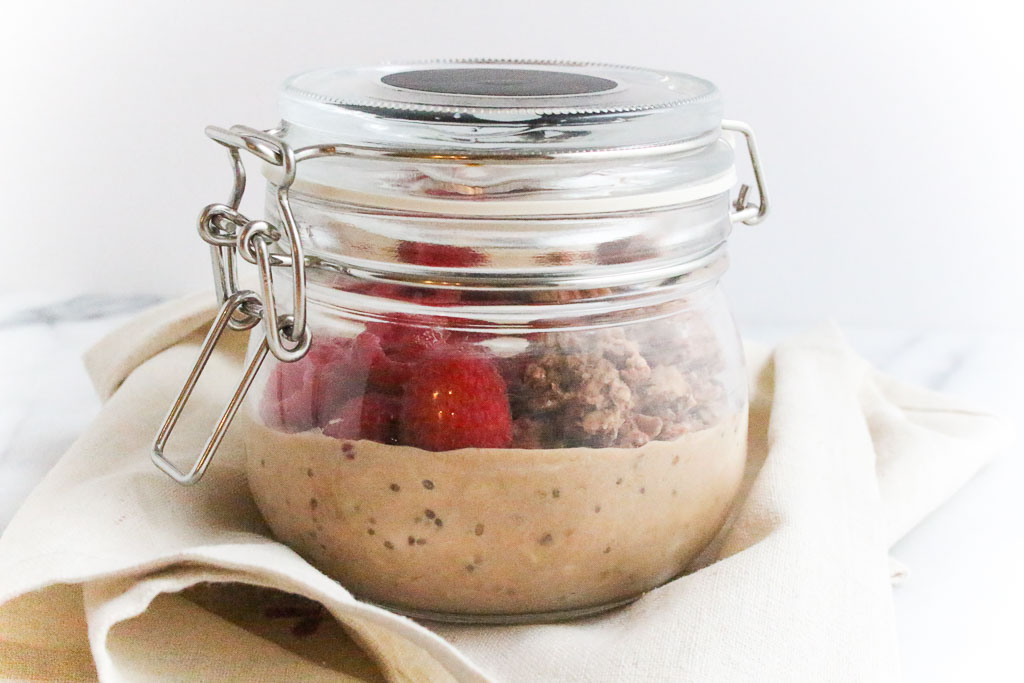
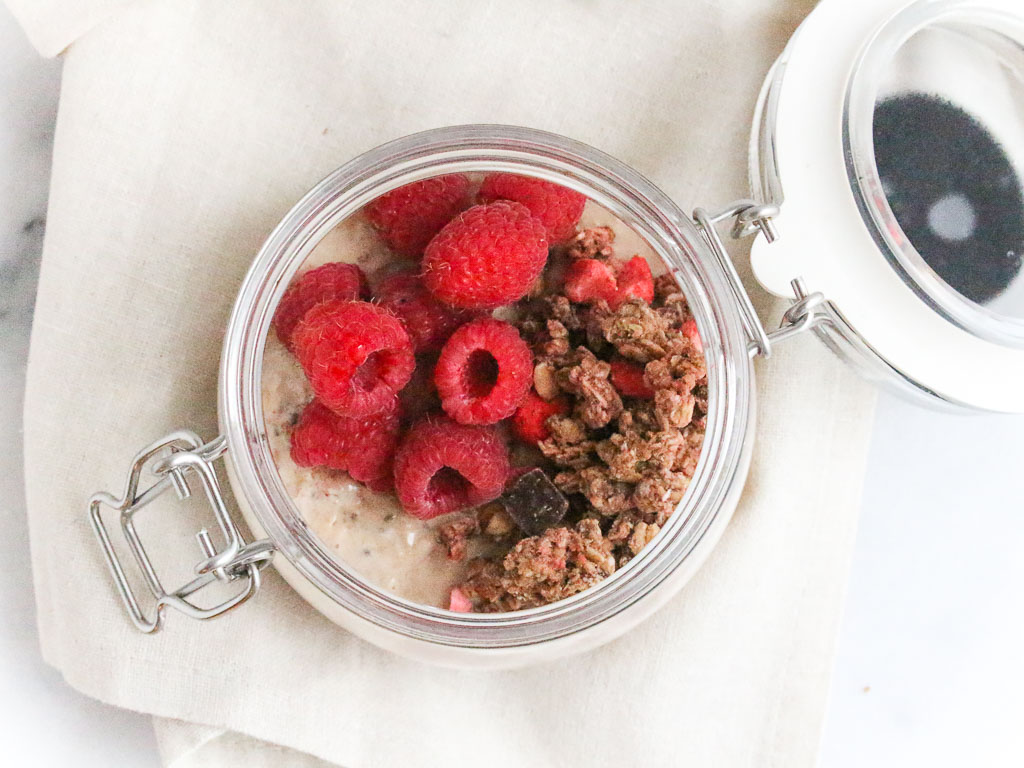
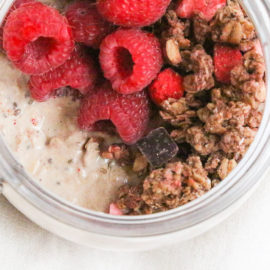
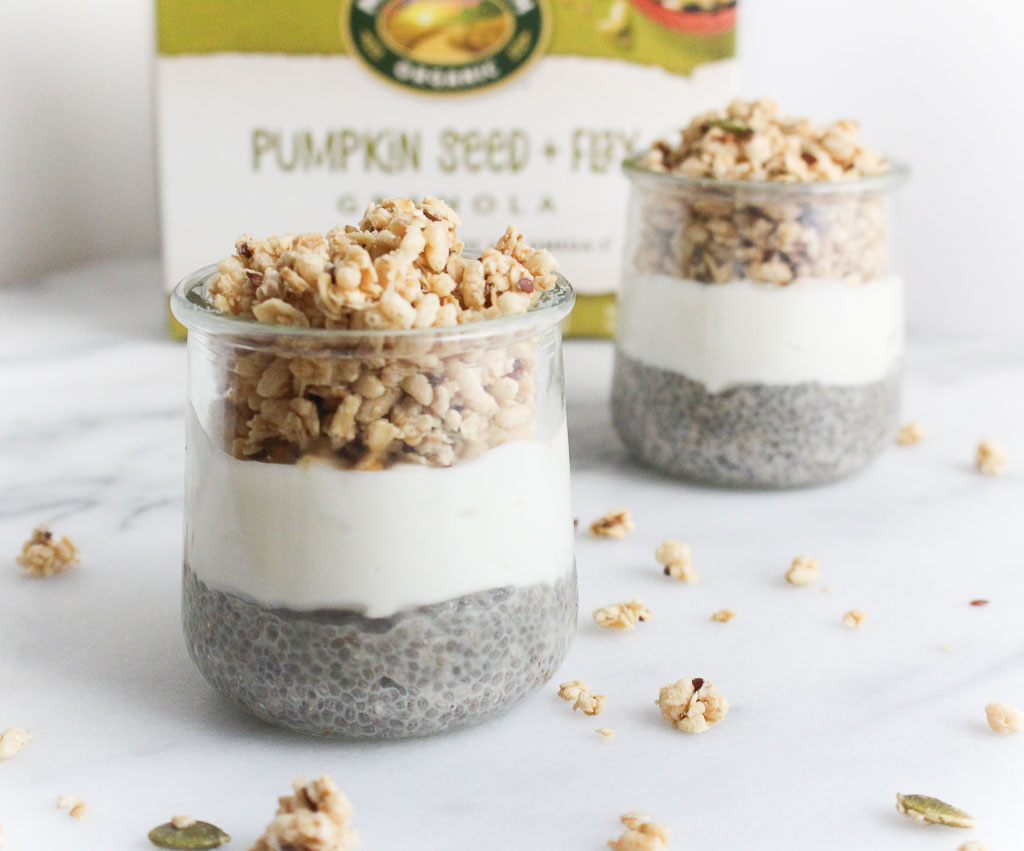
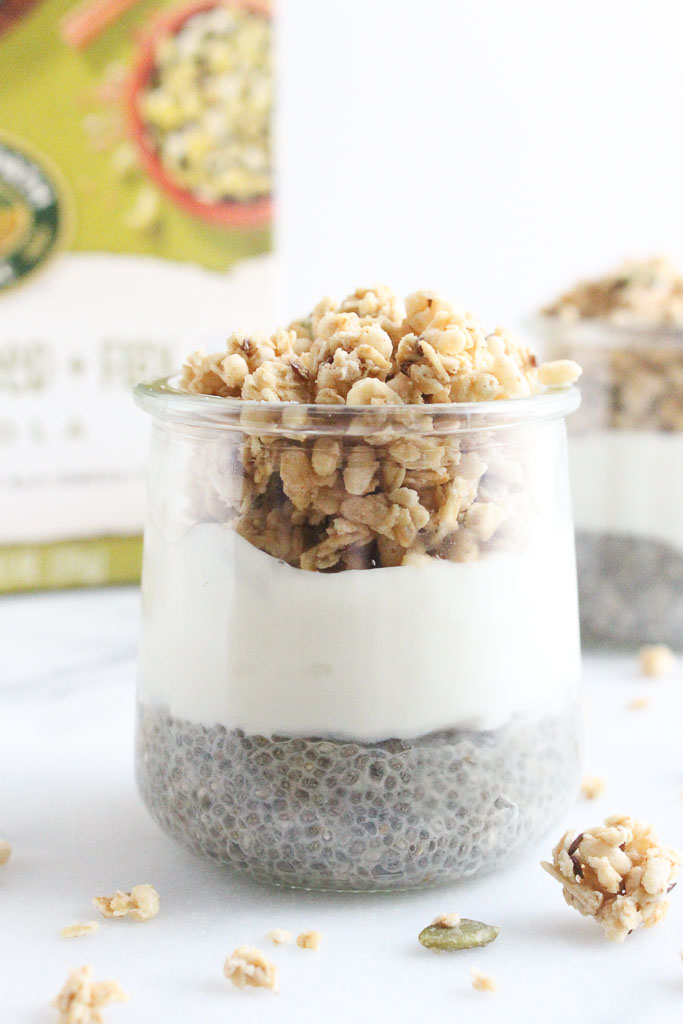
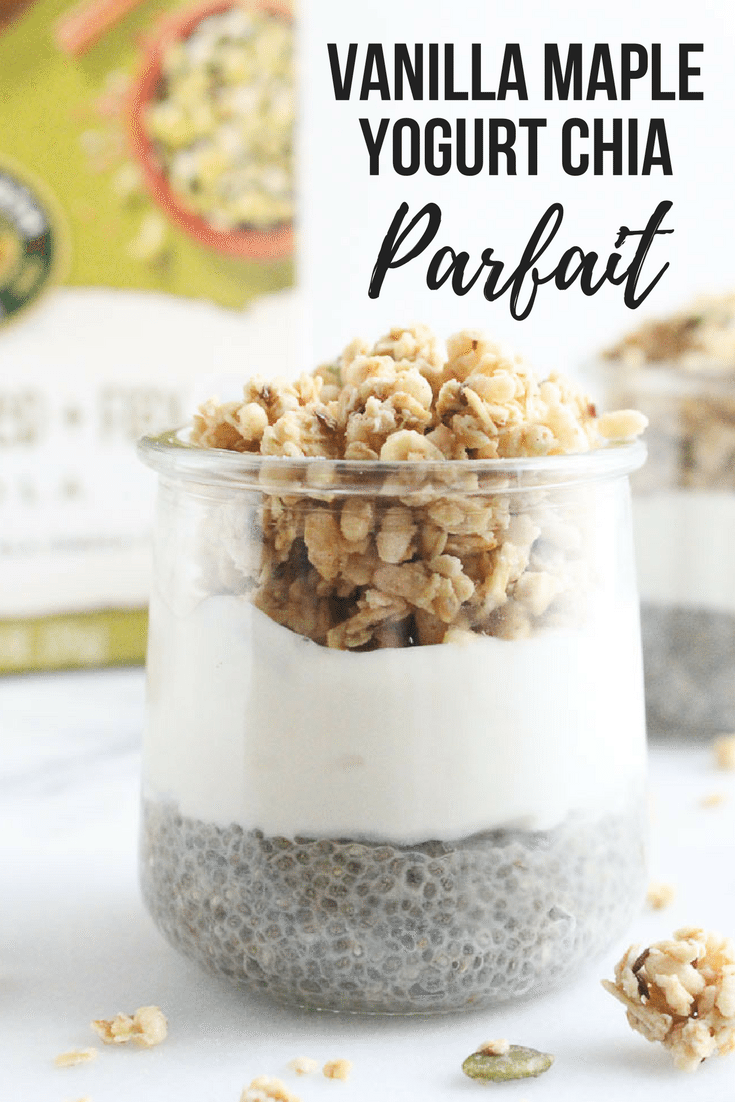
Looking for some simple meal prep solutions? Prep these simple Vanilla Maple Chia Yogurt Parfaits ahead of time for busy mornings. By posting this recipe I am entering a recipe contest sponsored by Nature’s Path and am eligible to win prizes associated with the contest. I was not compensated for my time.
I’m not going to lie, I wasn’t on board with the whole chia pudding trend when it first started circulating the internet. I wasn’t a fan of the texture. After trying it a few more times, it really grew on me. That goes to show that tastes/textures do evolve over time and we have to give foods a 2nd or even 10th chance.
This is a lesson I share with my clients all the time. We have to try new foods just more than once and in a variety of ways. I once hosted a cooking class that just focused on one ingredient – cauliflower. In this class, we cooked cauliflower in 5 different ways. It was interesting to see that all participants had their opinions on which version they enjoyed best. At the end of the day, everyone enjoyed cauliflower in at least one way.
For a while, I was blending my chia pudding to create a creamier consistency, but then the texture of the chia pudding grew on me and I really enjoy it as a breakfast since it keeps me full and satisfied all morning. Chia seeds are rich plant-source of omega-3 fatty acids, that can reduce inflammation.
No parfait isn’t complete without the granola layer. I topped mine with one of my favorites – Nature’s Path Pumpkin Seed + Flax Granola.
This post may contain affiliate links. Read my privacy policy.
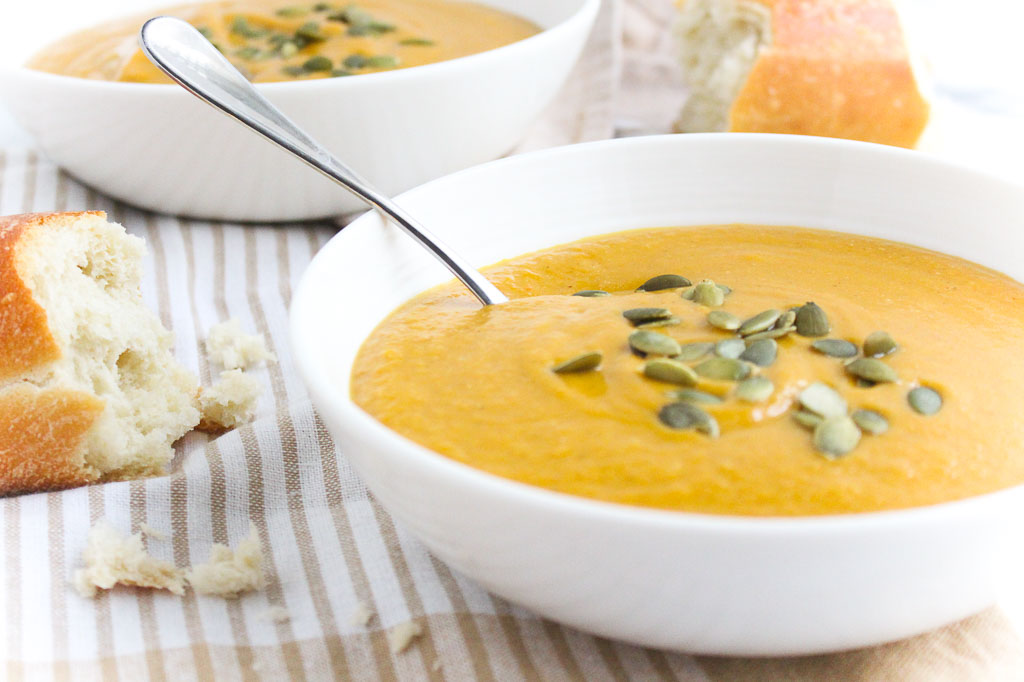
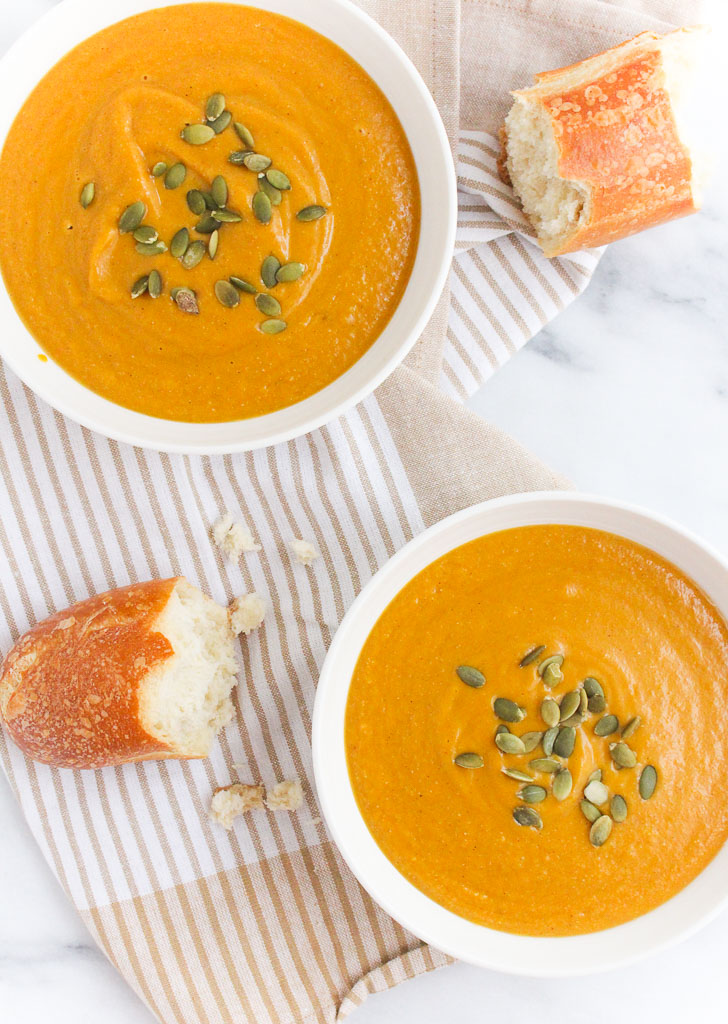
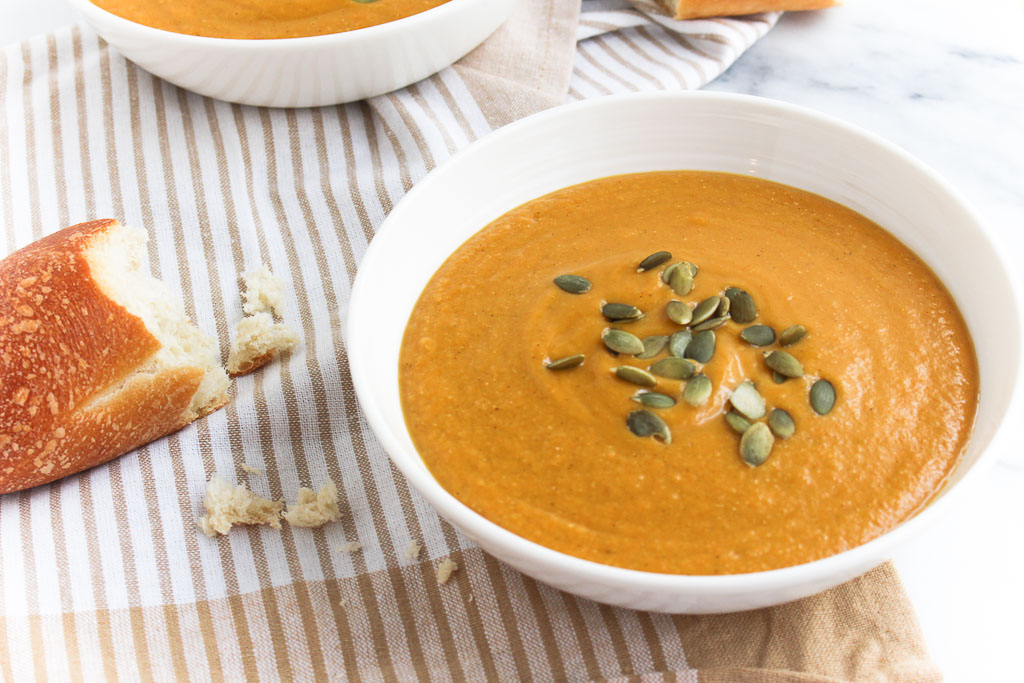
Butternut and Acorn Squash soup is a healthy, creamy, one-pot meal or can be served as an easy appetizer, so cozy up because dinner is almost ready!
Ever wonder how food bloggers come up with their recipes?
I pretty much think or talk about food all day. At work, I’m educating clients about nutrition through food or teaching cooking classes. Then, for the blog, my recipe creations are inspired by conversations I have, discussions in cooking classes or demonstrations, or simply from a particular ingredient. Travel definitely plays a big role in recipe development too. I love dining out when I travel, experiencing the local fare. I like to try and recreate recipes I’ve tried with my own little twist.
Ever wonder what kind of squash to use for different recipes? I break it down here!
Next time before you start dialing for takeout, really take a look at what is in your kitchen. You never know – you might whip up something delicious!
Ingredients Needed for Butternut and Acorn Squash Soup
Spices: garlic, nutmeg, salt and pepper, garam masala
Oil
Miso – I prefer chickpea miso or white miso
Cashews
Apple – try to get a sweeter variety such as Honeycrisp, Gala, or Pink Lady
Veggie broth – low sodium of course!
Water
How to Make Butternut Acorn Squash Soup
Line a baking sheet with parchment paper or a silicon baking mat and preheat the oven to 400 degrees.
Using a paring knife, pierce the squash, place them on the baking sheet, and bake for 20 minutes. Once they are done cooking, let them cool slightly before dicing into cubes.
Heat the olive oil over medium high heat in a large pot. Add the garlic, carrots, and onions.
Saute for about 3 minutes or until the onions start becoming translucent.
Add the nutmeg and garam masala and stir to coat the veggies.
Stir in the miso, cashew, cubed squash, and apple. Once combined, add the veggie broth and water. Make sure everything is covered and use more water if needed.
Simmer for 30 minutes, until the squash is tender and season with salt and pepper.
Add the soup to a blender in batches and blend until smooth. You could also use an immersion blender directly in the pot if you are using stainless steel.
Do You Have to Roast the Squash First?
Roasting the squash ahead of time makes them softer and much easier to peel and dice.
My Soup is Too Thick, What Should I Do?
Once you blend all of the ingredients together and you find that it’s thicker than you would like, simply stir in water a little at a time until it’s your desired consistency.
Is this Butternut Acorn Squash Soup Healthy?
You betcha! These winter squash varieties are full of antioxidants and vitamins! Not to mention the healthy fats and fiber from the cashews, and the nourishment of the broth base.
FREE Cooking Class
This recipe was featured as part of Virtual Teaching Kitchen’s FREE virtual cooking classes. Click here to learn more about the Virtual Teaching kitchen.
1 apple, peeled and diced (preferably a sweet variety like Honeycrisp, gala, pink lady)
4 cups low-sodium vegetable broth
2 cups water
1/4 teaspoon black pepper
salt, to taste
Instructions
Preheat oven to 400 degrees F. Line a baking sheet with parchment paper. To easily cut the squashes, pierce butternut squash and acorn squash with a paring knife. Place on a baking sheet and bake for 20 minutes to soften, so it will be easier to chop. Let cool until able to handle. Peel and dice squash into cubes.
In a large pot, heat olive oil over medium-high heat. Add onions, garlic, and carrots. Saute for about 3 minutes, until onions start to become translucent.
Add the garam masala and nutmeg and coat the vegetables.
Stir in the chickpea miso, cashews, butternut squash, acorn squash, and apple. Stir to combine. Add the vegetable broth and water, covering the vegetables. (Use more water, if needed).
Simmer soup for 30 minutes, until squash is tender. Season with salt and pepper.
In batches, add soup to a blender. Blend until smooth. If soup is too thick, add more water.
Serve warm. (Optional: sprinkle pepitas on top to garnish)
This post may contain affiliate links. Read my privacy policy.
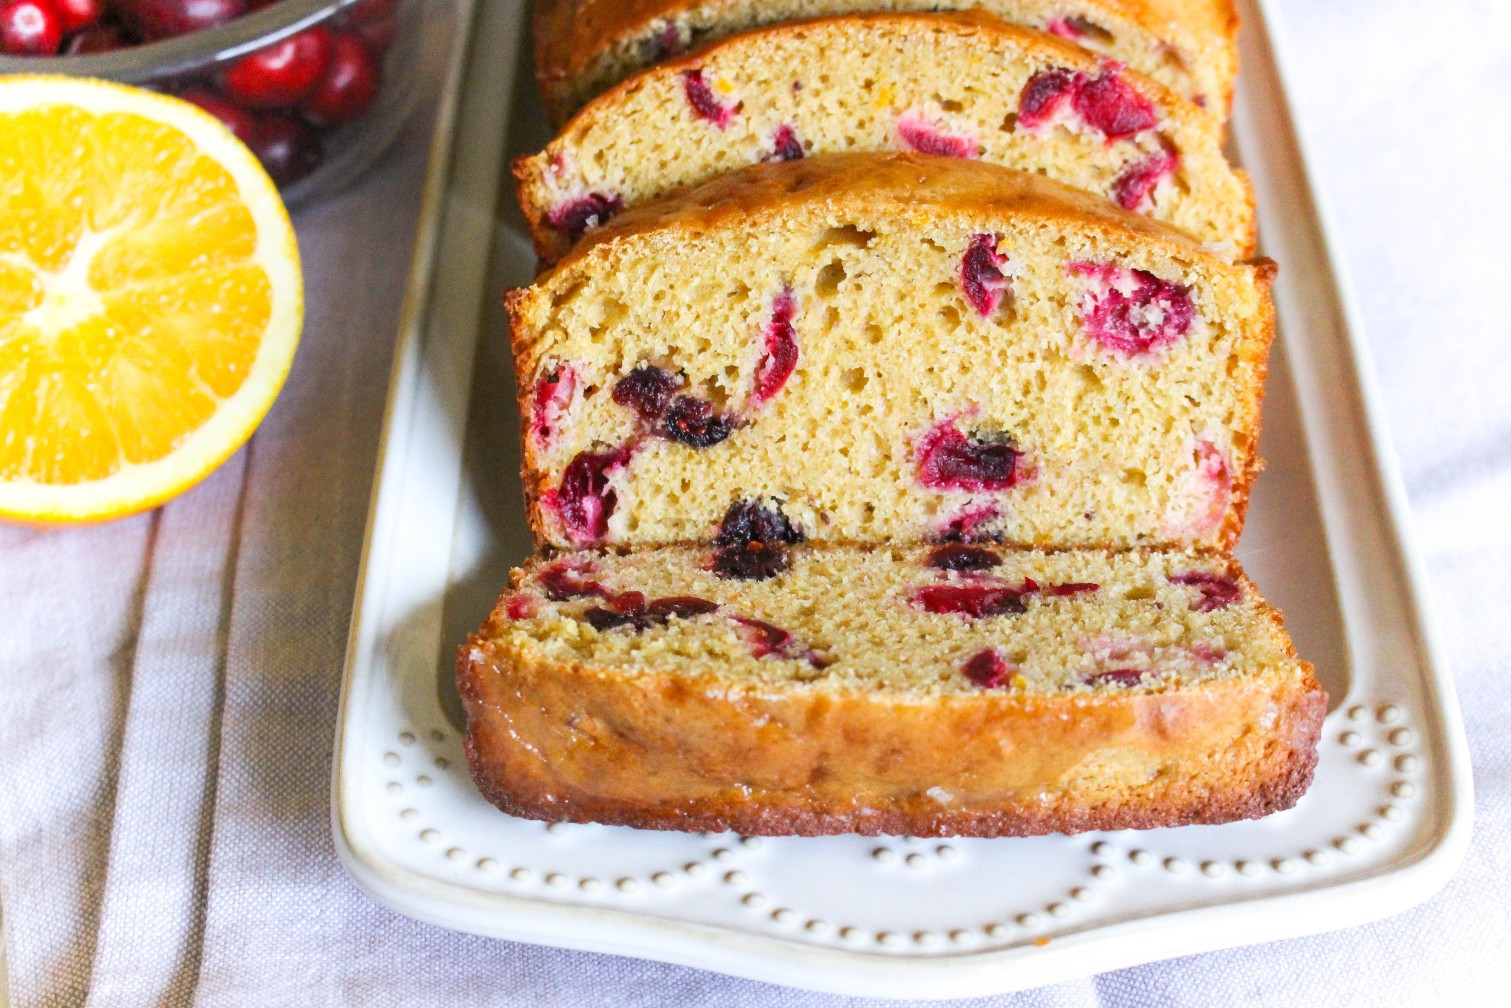
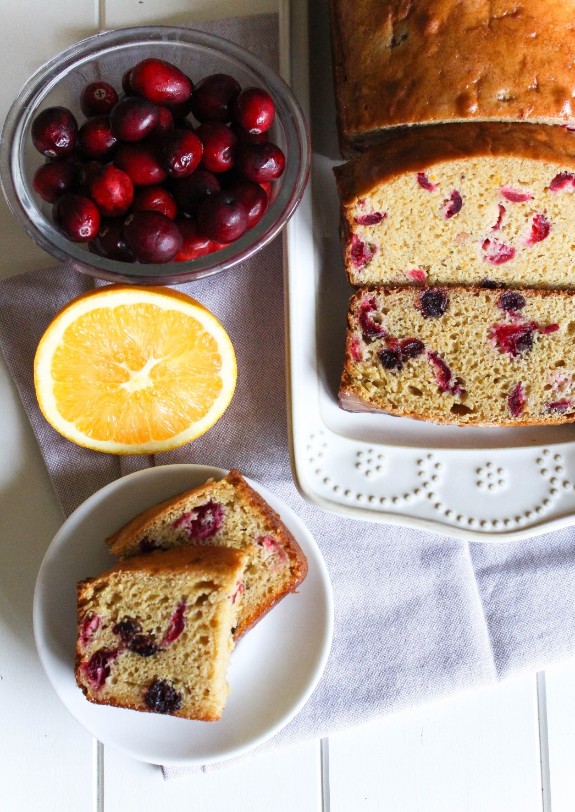
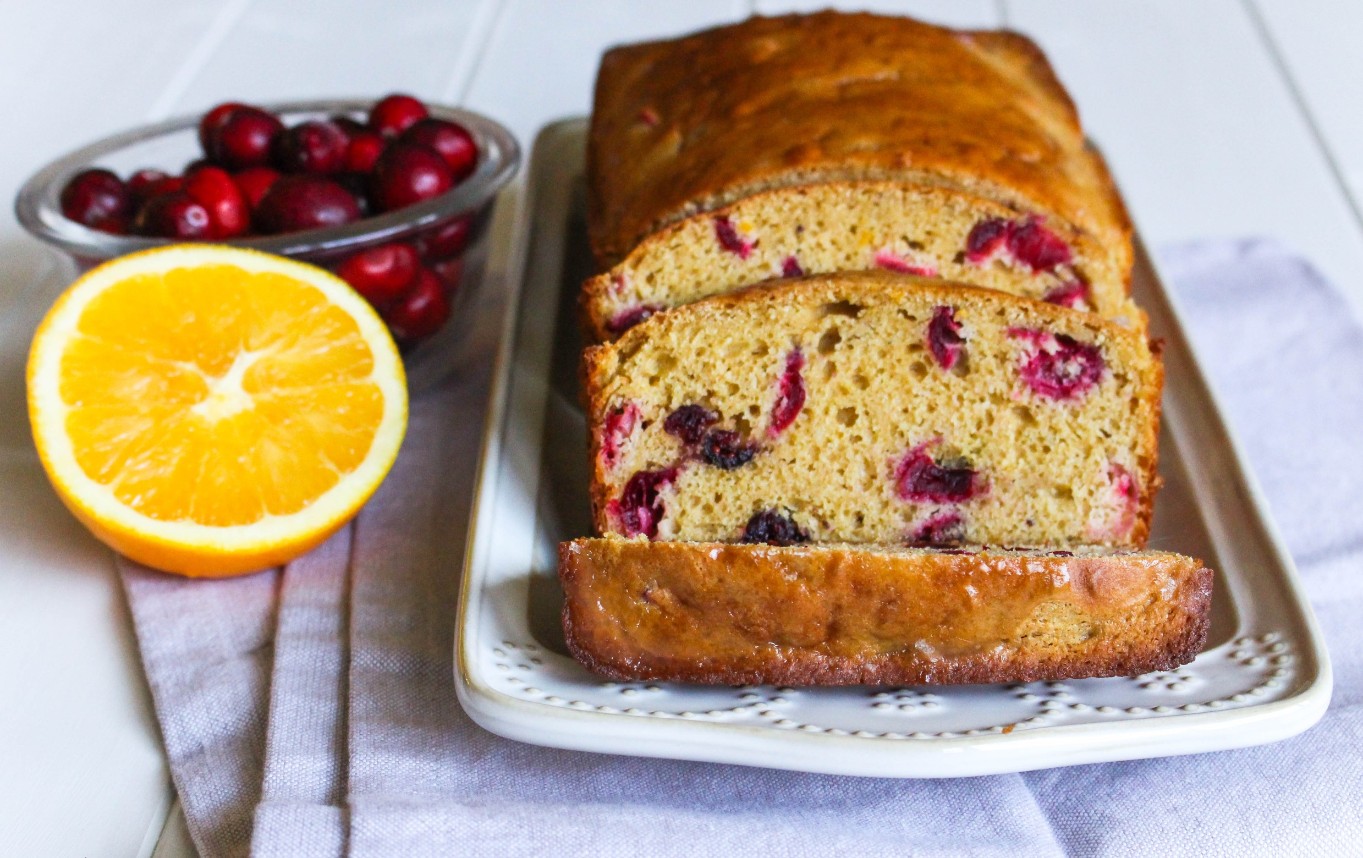
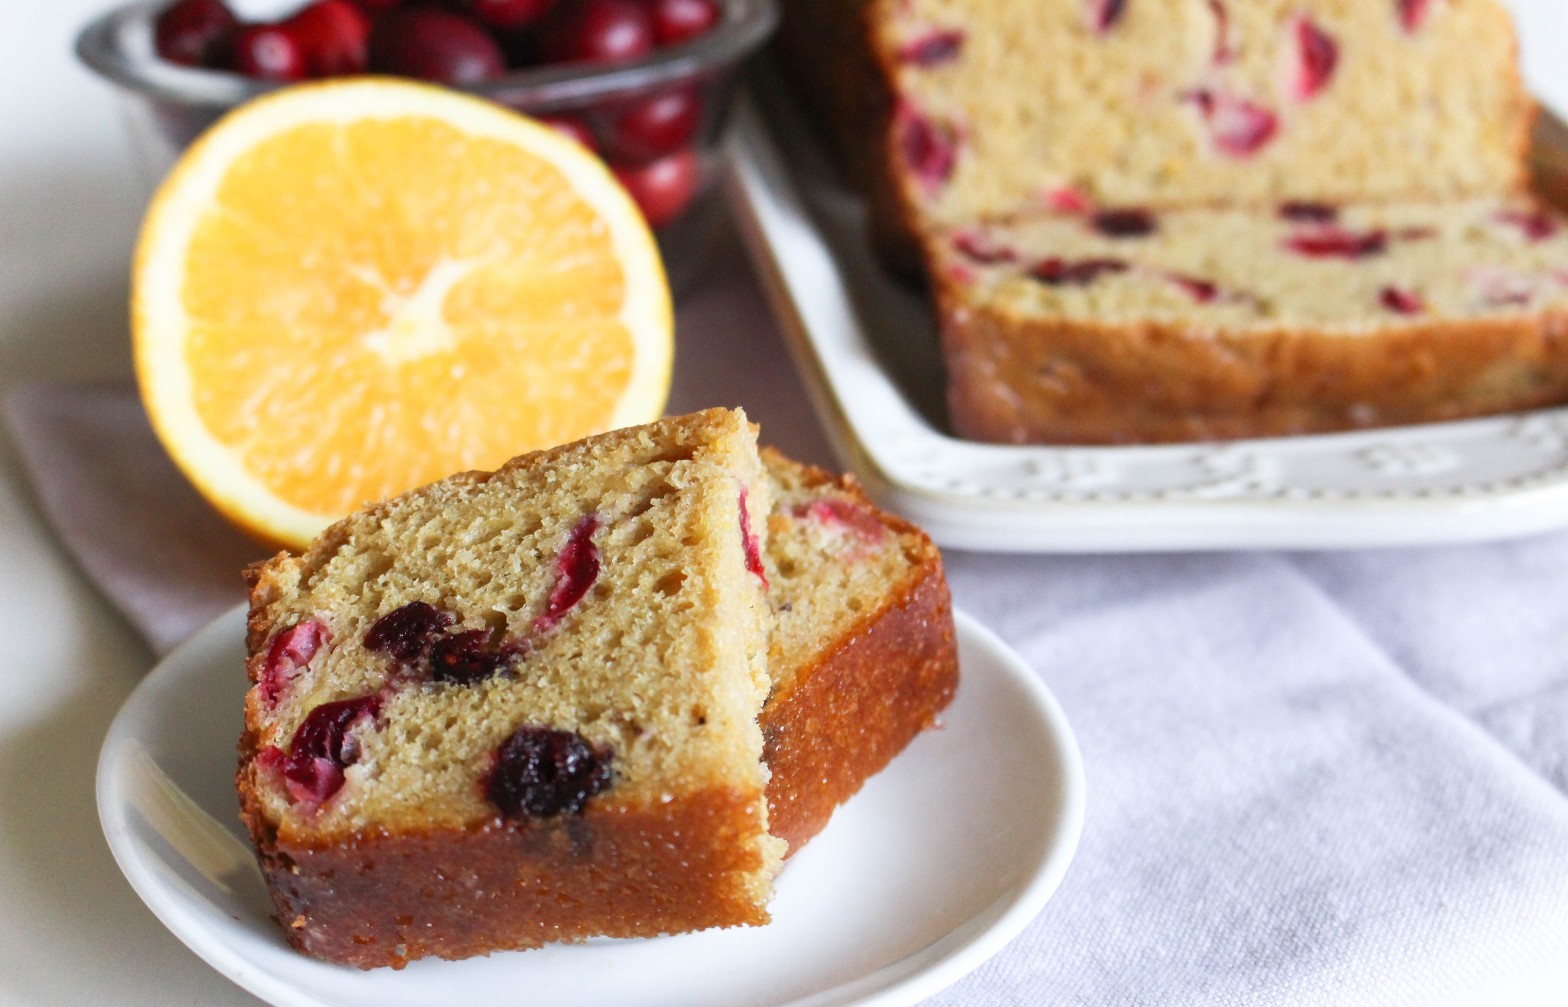
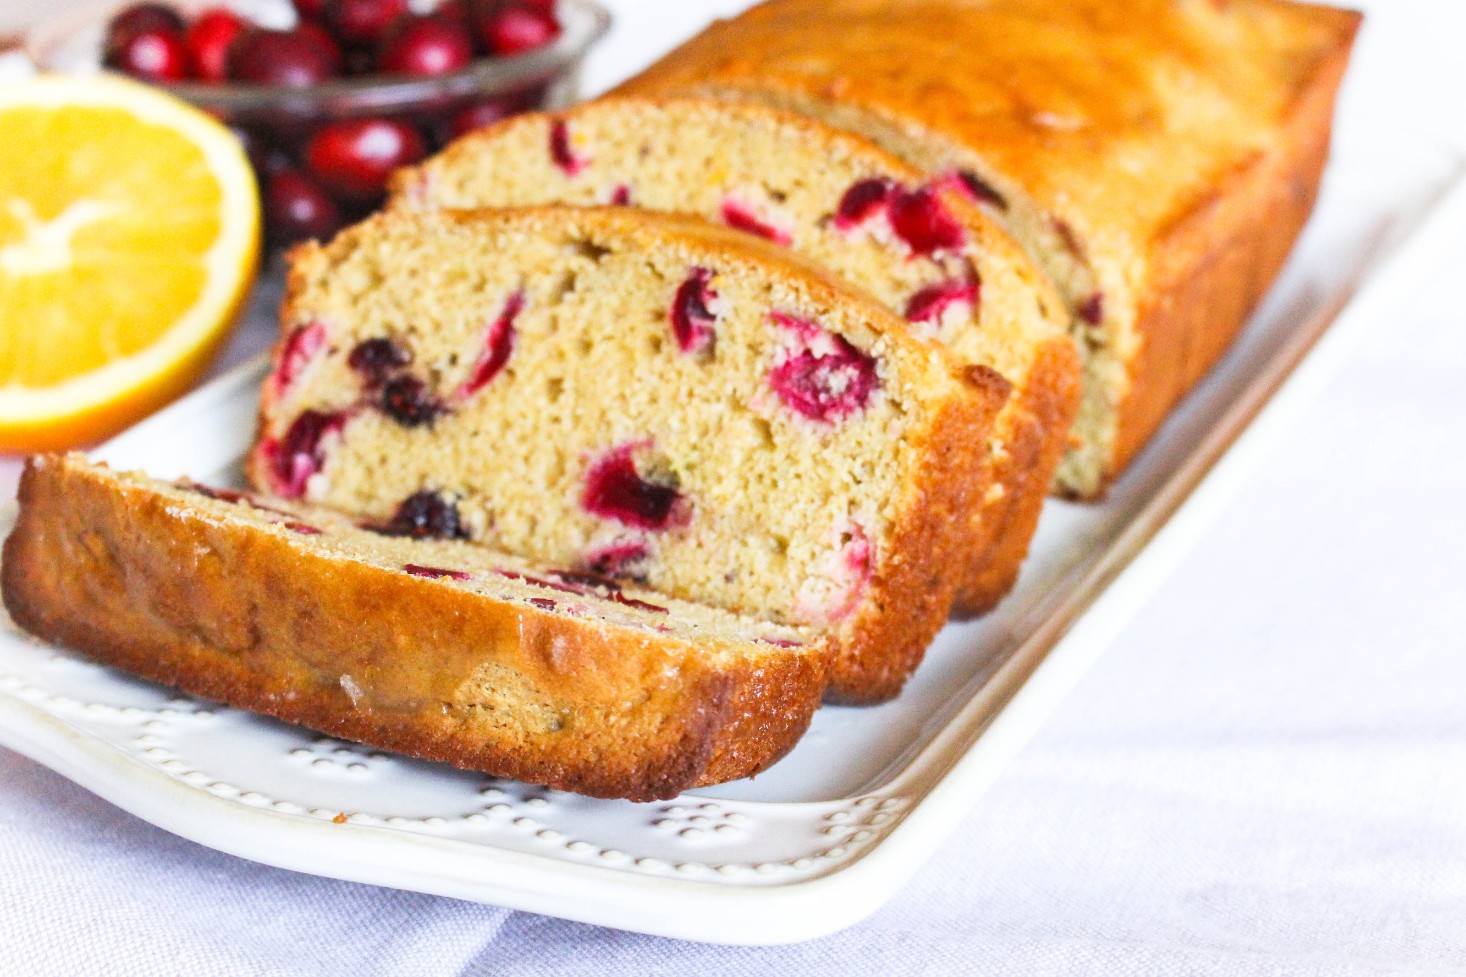
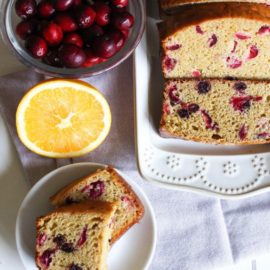
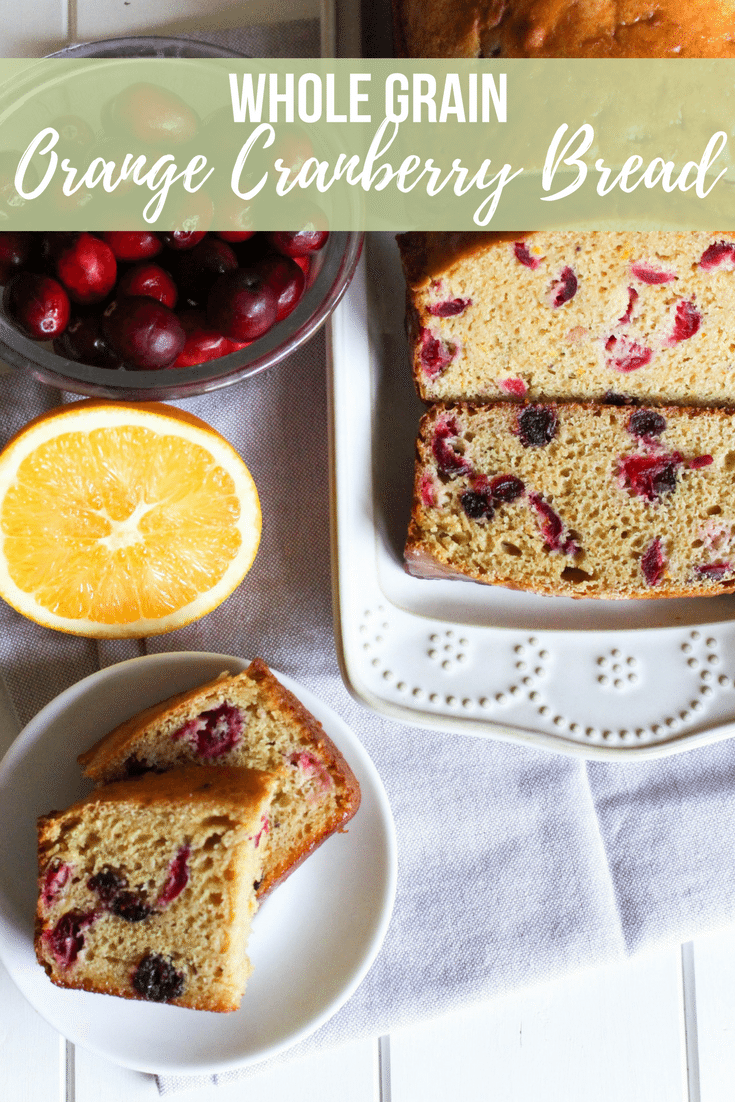
Have your house smell like the holiday season when you bake this Whole Grain Orange Cranberry Bread. Bake loaves as holiday gifts that your friends and family will love and they won’t even know it’s lightened up!
I absolutely love baking during this time of year. Many gifts I like to give come in the form of food. When I was younger, I used to help my mom bake mini quickbreads to give to our neighbors, teachers, mailman, etc. to spread the holiday cheer. They were always wrapped with a nice bow and a little note attached. Everyone likes a homemade treat to enjoy during the hectic holiday season.
I’ve been playing around with using different types of flours in my baking recipes lately. I have not yet mastered understanding gluten free flours yet (I’m talking to you coconut flour – you dry crumbly mess!), but I am getting better with other whole grain flours.
Do you love baking as much as I do? I try to incorporate more whole grains vs. refined grains into my daily diet and during the holiday season, I do love baking, so why not add some whole grains here too!
The orange-cranberry combo is such a classic and always reminds me of the holiday season. While the holiday season may bring some indulgences with it, you still can make recipes taste indulgent with a healthy twist like this whole grain orange cranberry bread, by switching to whole grains, trimming back on sugar, and adding wholesome fruit.
What is White Whole Wheat Flour?
The look of this recipe may be deceiving when I tell you I used a whole wheat flour. Hmmm.. shouldn’t it be browner? Enter – White WholeWheat Flour. Sounds like a contradiction, right?
White wheat is a different type of wheat that has no major genes for bran color (unlike traditional “red” wheat which has one to three bran color genes). An easy way to think of it is as a sort of albino wheat. The bran of white wheat is not only lighter in color but it’s also milder in flavor, making whole white wheat more appealing to many people accustomed to the taste of refined flour.
The term “white flour” has often been used to mean “refined flour,” so “whole white wheat flour” sounds like a contradiction in terms. But it is simply WHOLE flour – including the bran, germ and endosperm – made from WHITE wheat. – source, Oldways
White whole wheat flour is a whole grain and a much easier solution to add in whole grains into your favorite baking recipes without compromising appearance, taste, and texture.
I’ve noticed in baking white whole wheat flour is not as dense as a regular whole wheat flour, but more of the perfect balance in between of all-purpose flour and whole wheat flour.
Ingredients Needed For Healthy Cranberry Bread
white whole wheat flour
sugar
salt
baking powder
baking soda
Oranges – these are going to be juiced and zested, so skip the store bought
milk – you can use dairy or plant based, your choice!
Prep your loaf pan by spraying with non-stick spray or use parchment paper and preheat the oven to 375 degrees.
In a medium-size mixing bowl sift together the flour, salt, sugar, baking powder, and baking soda.
Using an electric mixer (hand or stand) combine the orange juice, milk, yogurt, eggs, and vanilla extract.
Once it’s smooth, add the dry ingredients into the wet and continue mixing.
Fold in the cranberries.
Pour the batter into the loaf pan and bake until a toothpick comes out clean. This should take about 35 to 40 minutes.
Once the cranberry bread has finished baking, allow it to cool on a baking rack while you make the glaze.
Whisk together the sifted powdered sugar and orange juice. Then drizzle on top! You want to be sure the loaf has cooled some or else the glaze will just run off.
Can I Use Frozen Cranberries?
While fresh cranberries have the best flavor, you can use frozen if that’s what you have. Be sure they are thawed completely before using and try to remove as much excess water as you can.
Health Benefits of Cranberries:
Cranberries naturally contain the flavonoid, proanthocyanidin (PAC) and other polyphenols that have potential health benefits, including reducing the risk of heart disease. Plus, just one cup of fresh cranberries contain 5.1 grams of fiber, 94 mg of potassium, and over 20% of the Daily Value for vitamin C. Nutrition information provided by the Cranberry Institute.
I caught myself cutting off a piece here and there every time I walked through the kitchen. Get ready friends and family, this Whole Grain Orange Cranberry Bread is going to be delivered to you with a ribbon and a special note from me this holiday season!
Have your house smell like the holiday season when you bake this Whole Grain Orange Cranberry Bread. Bake loaves as holiday gifts that your friends and family will love and they won’t even know it’s lightened up!
Ingredients
Scale
2 cups white whole wheat flour
⅓ cup sugar
¼ tsp salt
2 tsp baking powder
½ tsp baking soda
2 oranges, juiced and zest (reserving 1 tbsp juice)
½ cup milk
2 tbsp plain Greek yogurt
2 eggs
1 tsp vanilla extract
1½ cups fresh cranberries, chopped
For the glaze:
1 tbsp reserved orange juice
1 tbsp powdered sugar, sifted
Instructions
Preheat the oven to 375 degrees F. Spray a loaf pan with cooking spray, set aside.
In a medium bowl, sift together white whole wheat flour, sugar, salt, baking powder, and baking soda.
In a large bowl, with an electric mixer, beat together orange juice, milk, yogurt, eggs, and vanilla extract. Mix dry ingredients into wet ingredients slowly, until just combined. Fold in cranberries.
Bake in the oven for 35-40 minutes, until golden brown and a toothpick inserted in the center, comes out clean.
Let cool on a rack. Meanwhile whisk together the reserved orange juice and powdered sugar. Drizzle on top of the loaf. Slice and enjoy!
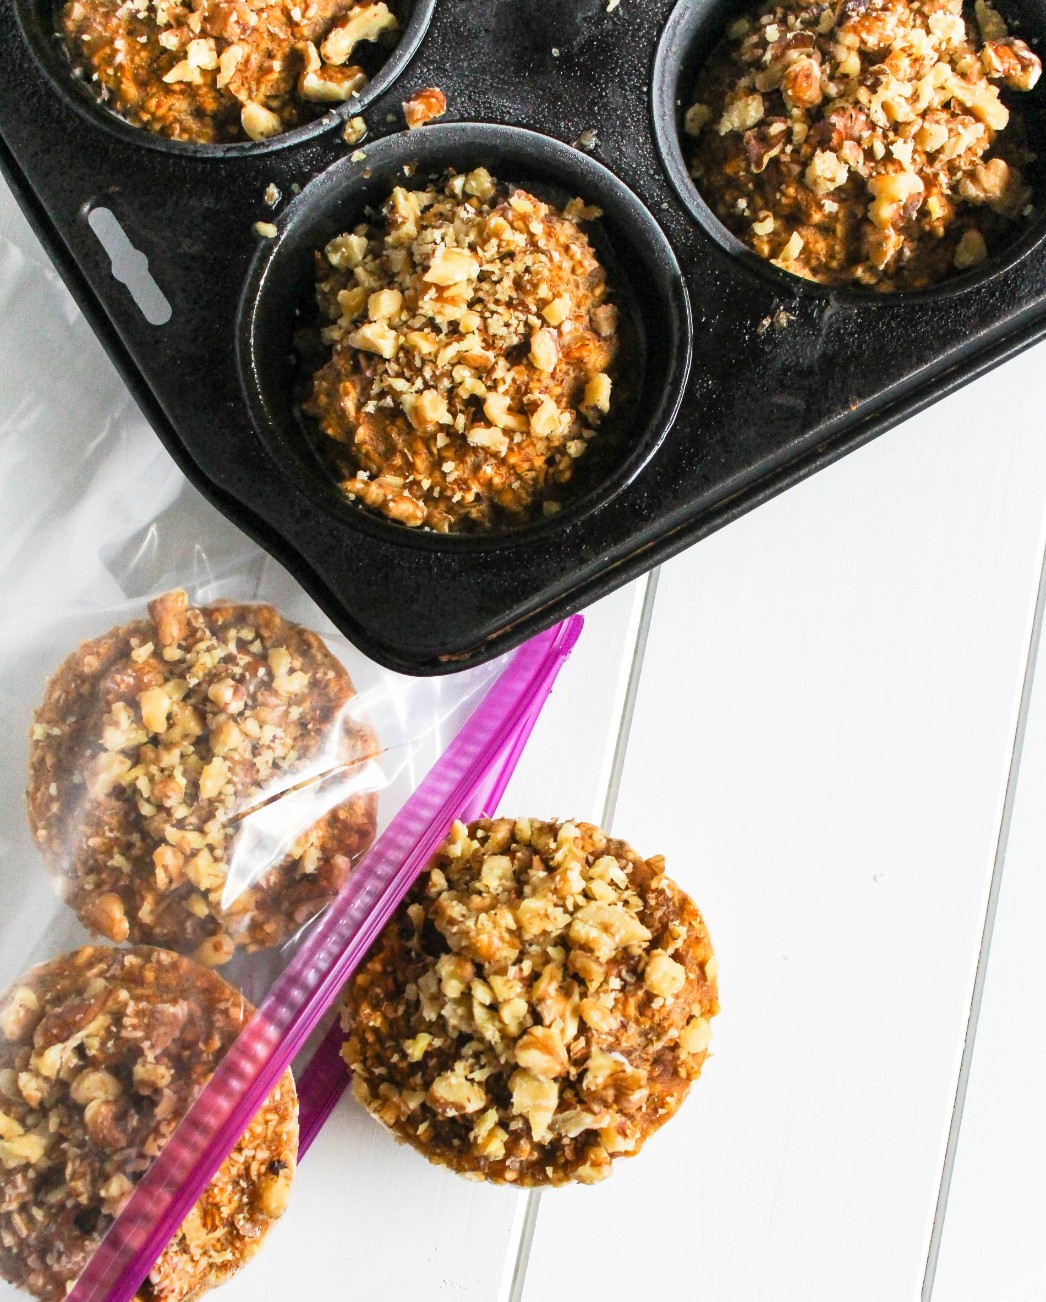
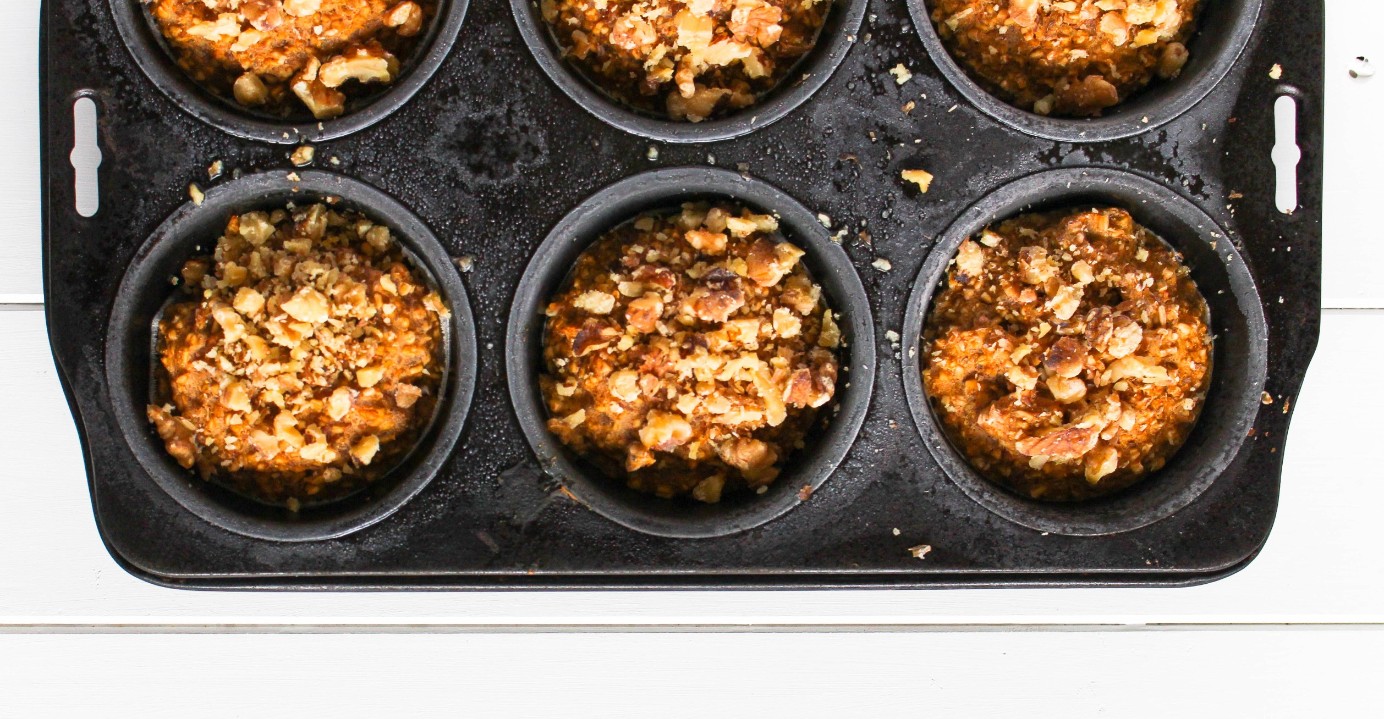
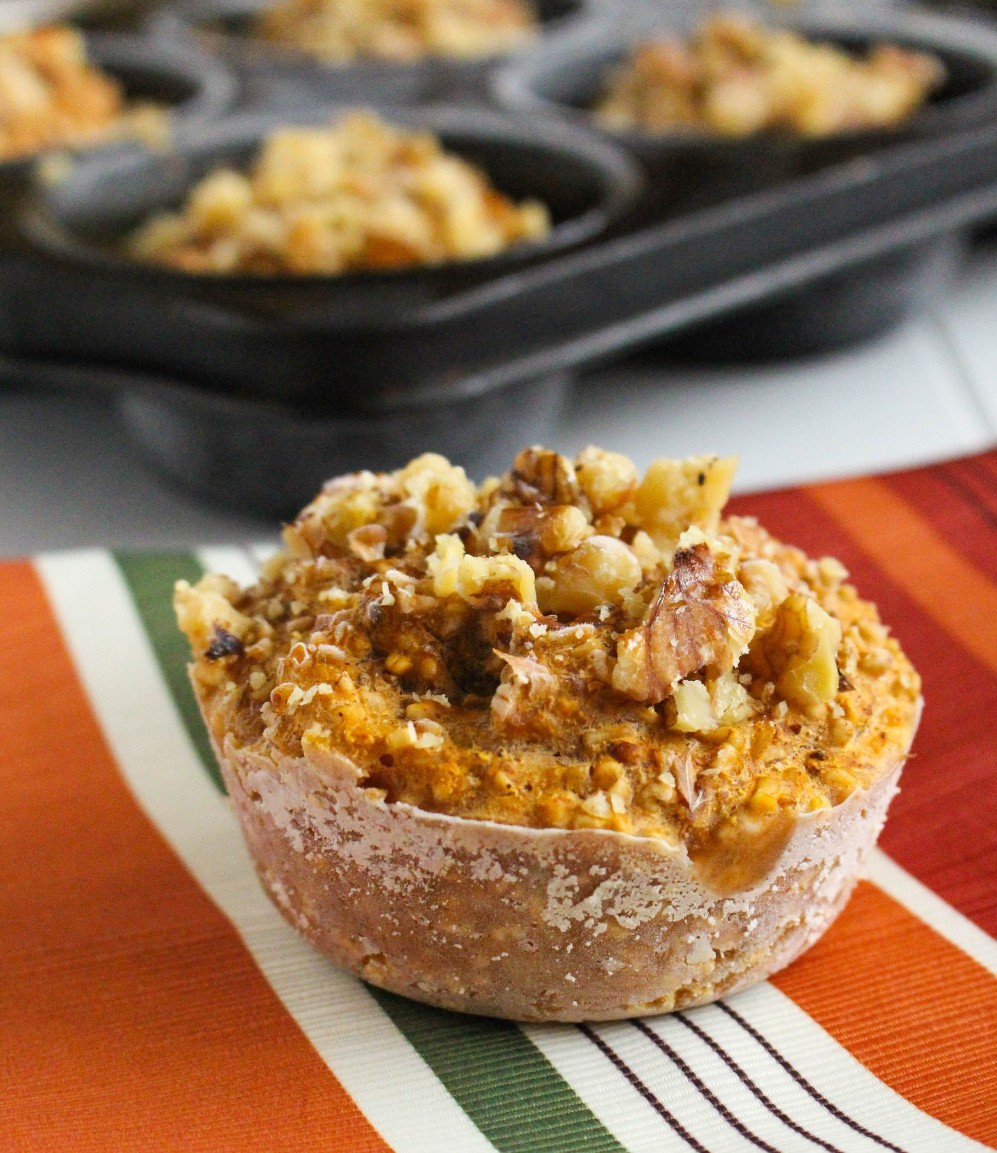
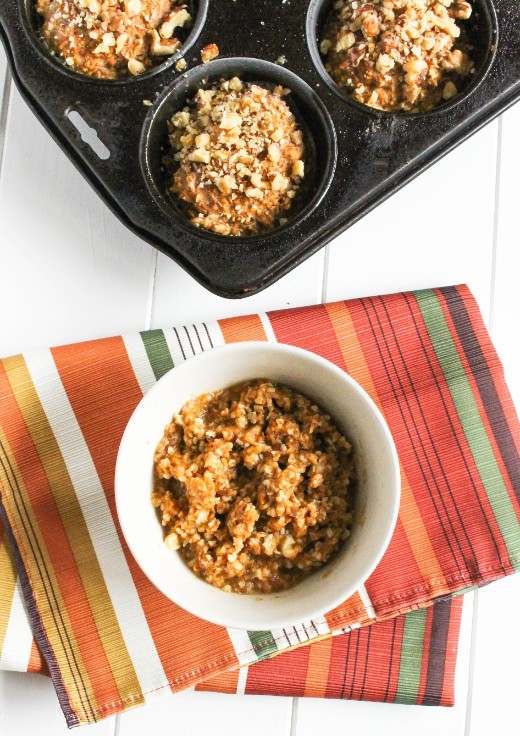
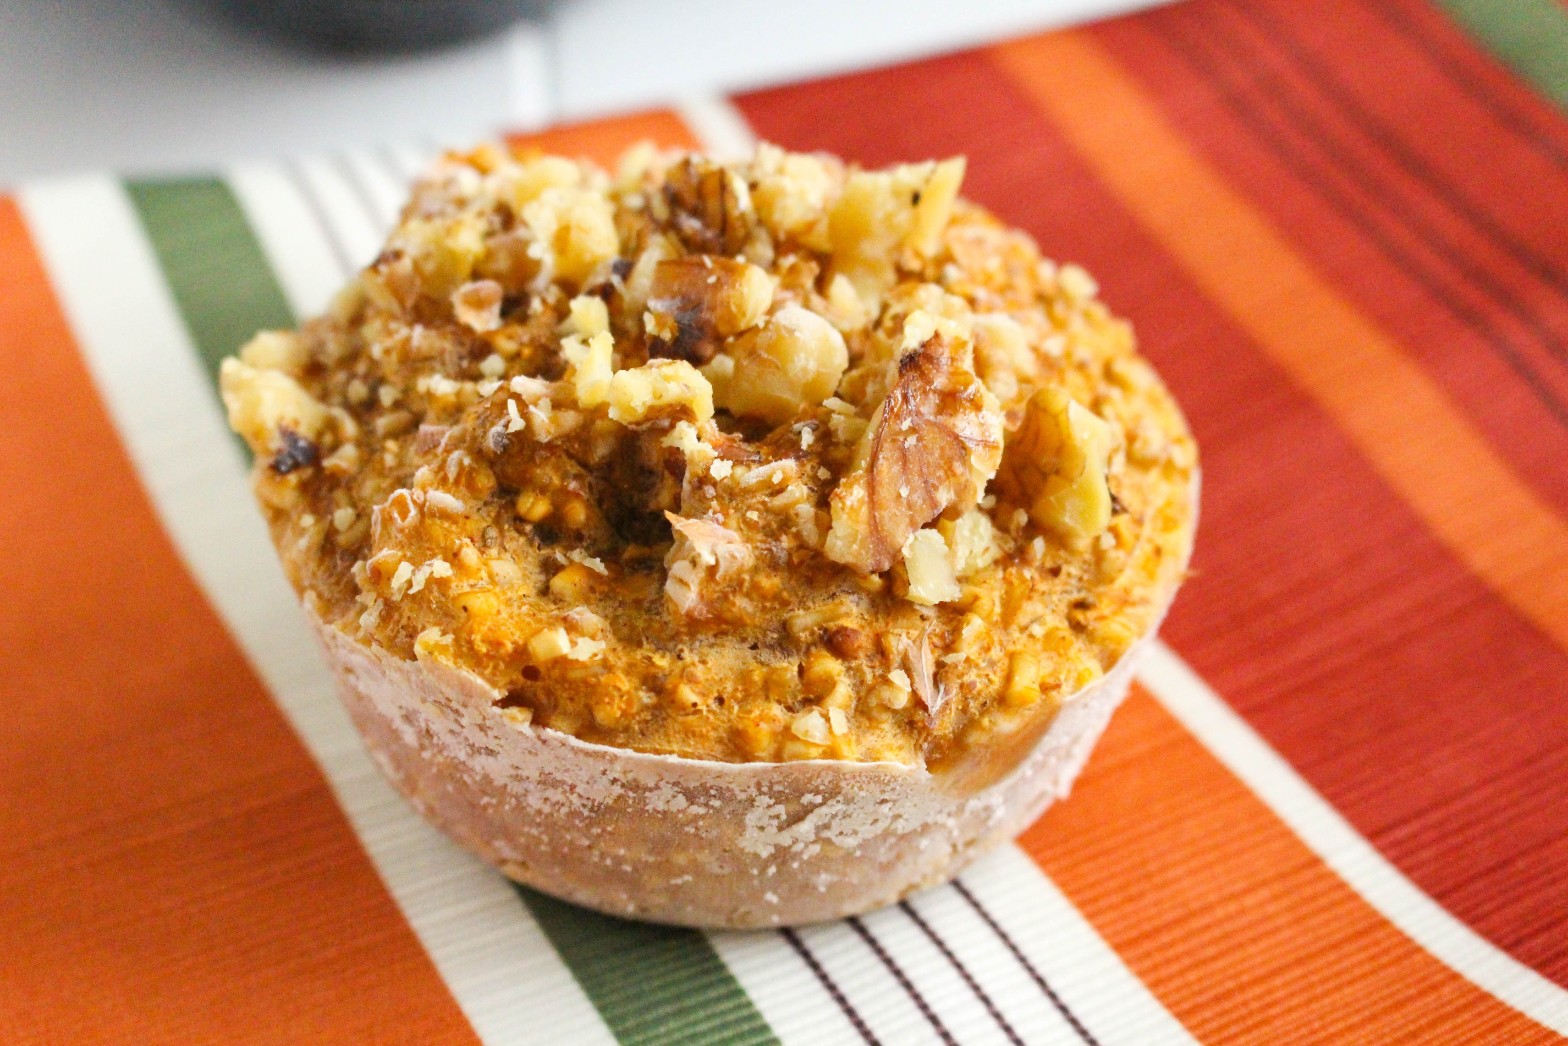
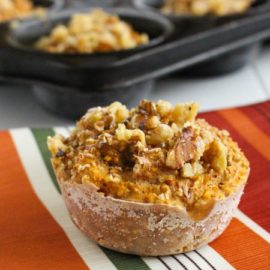
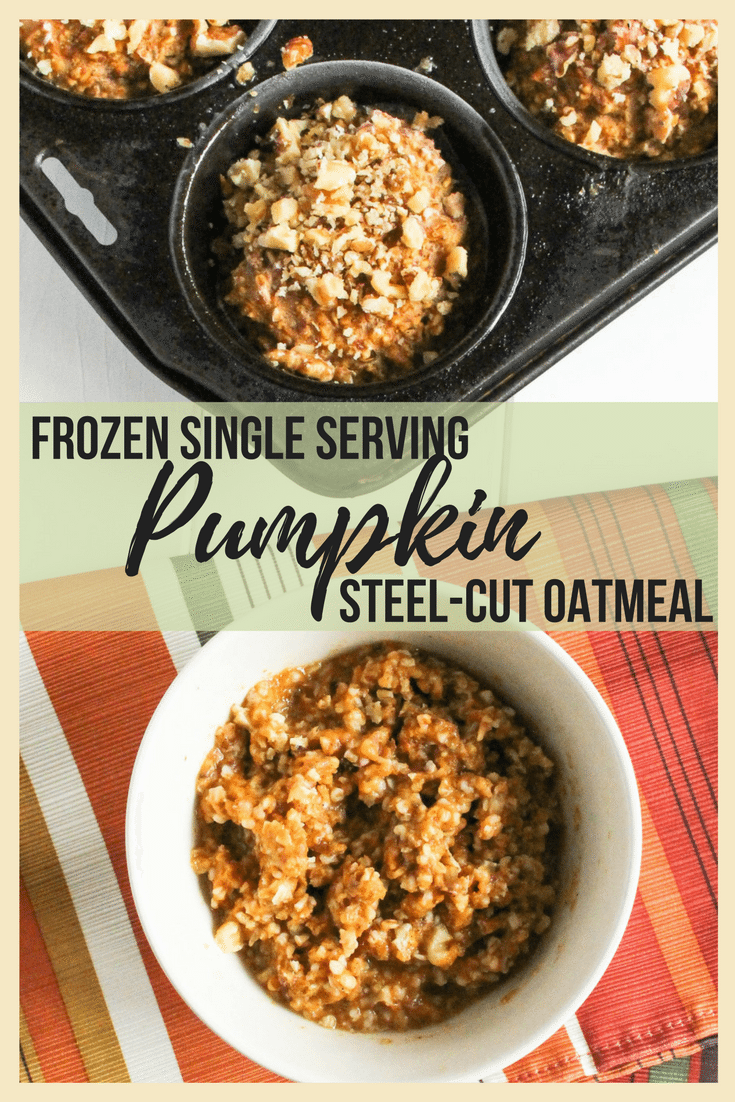
Don’t have time in the morning to prepare hearty steel cut oatmeal for breakfast? With a little meal prep will help solve that morning rush and nourish your body with a wholesome breakfast with these Frozen (Single Serving) Pumpkin Steel Cut Oatmeal.
Breakfast is the most important meal of the day. How many times have you heard that before? While I believe all meals are important, a good breakfast fuels you up and gets you ready for the day. During the weekends, I love having a leisurely breakfast, sipping my coffee, and enjoying my morning. During the week breakfast making time is 5 minutes or less, rush out the door and coffee in the car on my commute.
Steel cut oatmeal is a hearty wholesome breakfast, but its downfall is that it takes about 15-20 minutes to cook. I’d rather get an extra 20 minutes of sleep. I know I’m not the only one!
Want to enjoy steel cut oats in under 2 minutes? Meal prep to the rescue! Spend 20 minutes one day and have steel cut oats all week. Even if they weren’t steel cut oats and rolled oats instead, the time to take out all the mix-ins is just too much when you are trying to get out the door. Instead, simply take your little frozen single-serving steel cut oat “muffin”, add a few drops of water and pop it into the microwave.
steel cut vs. rolled oats vs. old fashioned oats – what’s the difference?
Steel cut oats vs. rolled oats vs. old-fashioned oats can get confusing. Steel cut oats are whole oat groats cut into little pieces. They are higher in fiber and protein than rolled and instant oats making it more filling and satisfying breakfast.
Make these. You’ll thank me when you are enjoying a hearty breakfast with that extra 20 minutes of sleep.
Don’t have time in the morning to prepare hearty steel cut oatmeal for breakfast? With a little meal prep will help solve that morning rush and nourish your body with a wholesome breakfast with these Frozen (Single Serving) Pumpkin Steel Cut Oatmeal.
Ingredients
Scale
1 cup steel cut oats
3 cups water
⅛ tsp salt
1 banana, mashed
1½ cup pumpkin puree
2 tbsp chia seeds
2 tbsp ground flaxseed
2 tsp pumpkin pie spice
1 tsp pumpkin pie spice extract (can sub vanilla extract)
½ cup walnuts, chopped
Instructions
In a pot, bring water to a boil. Add salt and steel cut oats. Reduce heat to a low simmer. Cover and cook 15. Stir once or twice during cooking time.
Remove oats from heat. Stir in mashed banana, pumpkin, chia seeds, flaxseed, cinnamon, pumpkin pie spice, and pumpkin pie extract.
Spray a large muffin pan with cooking spray. Fill 6 muffin cups with the steel cut oats. Sprinkle chopped walnuts on each.
Freeze steel cut oats in muffin tins until solid. Remove from muffin pan and store in a ziplock bag.
To enjoy warm, simple add a few drops of water and reheat in the microwave for 1 minute and 30 seconds – 2 minutes.
This post may contain affiliate links. Read my privacy policy.
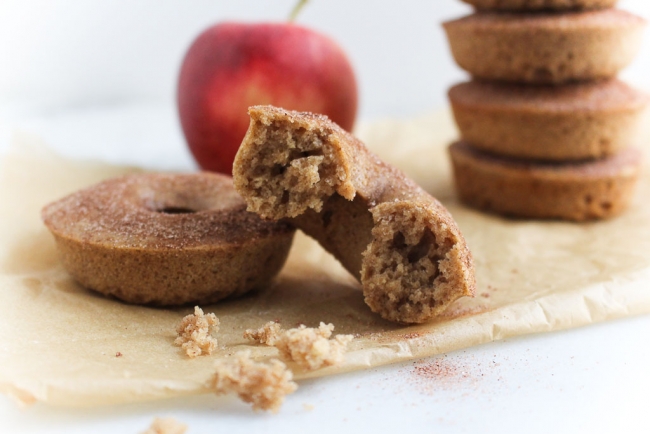
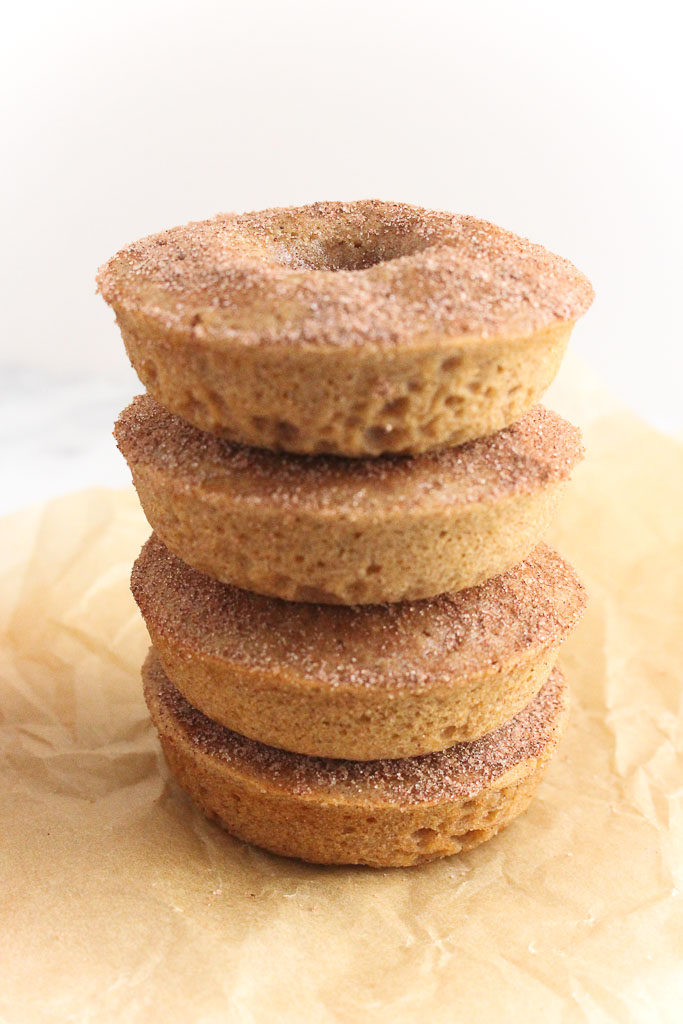
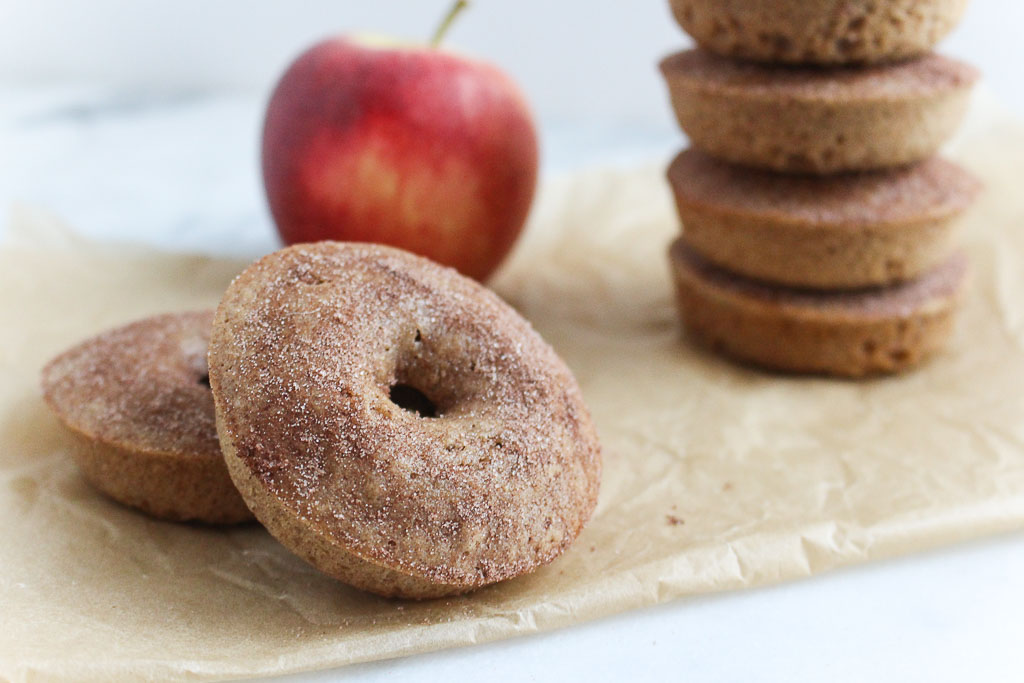
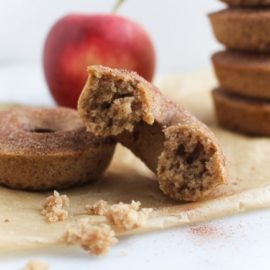
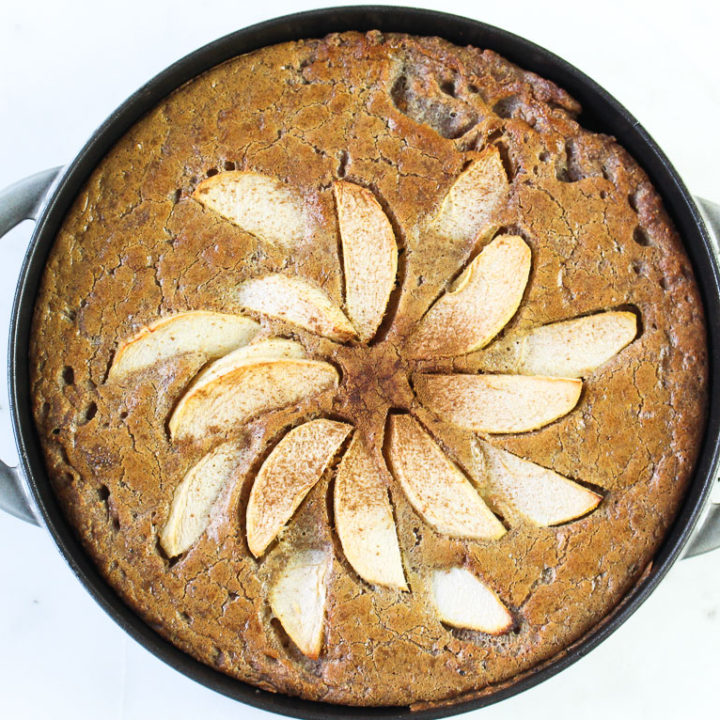
Enjoy the taste of Fall with these Baked Apple Cider Donuts!
This is my favorite time of year. The fall crisp air means, scarves, boots, and apple picking! I go apple picking every year and I always have to get an apple cider donut when I am at the orchard. You now can make them in the comfort of your own home with this donut recipe.
These donuts are baked instead of fried and use white whole-wheat flour to incorporate more whole grains. White whole-wheat flour – sounds like a contradiction, right?
What is white whole wheat flour?
“White wheat is a different type of wheat that has no major genes for bran color (unlike traditional “red” wheat which has one to three bran color genes). An easy way to think of it is as a sort of albino wheat. The bran of white wheat is not only lighter in color but it’s also milder in flavor, making whole white wheat more appealing to many people accustomed to the taste of refined flour.
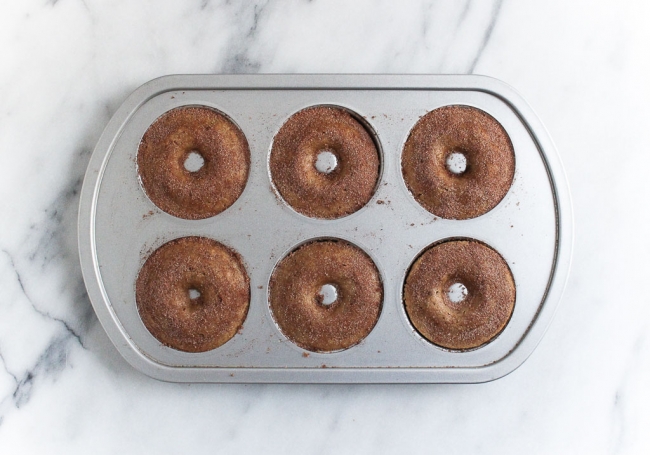
If you don’t have a donut pan, you can always use a muffin tin. Cook time may vary. To check for doneness, insert a toothpick in the center and see if it comes out clean.
For the donuts: 1 cup white whole-wheat flour 1/3 cup sugar ½ teaspoon baking powder ¼ teaspoon salt ¾ teaspoon cinnamon ¼ teaspoon nutmeg 1/8 teaspoon ground all spice 1/8 teaspoon ground ginger 1 egg 2 tablespoons butter, melted ½ cup apple cider
Cinnamon sugar topping: ½ tablespoon sugar ¼ teaspoon cinnamon
Instructions
Preheat oven to 350 degrees F. Coat donut pan with cooking spray.
In a large bowl, sift white whole-wheat flour, sugar, baking powder, salt, cinnamon, nutmeg, all spice, and ginger.
In another bowl, whisk together egg, melted butter, and apple cider.
Mix the wet ingredients into the dry ingredients until just combined.
Add batter to piping bag or large ziplock bag (cutting off the corner) and pipe batter into donut pan.
Bake for 15 minutes, until a toothpick comes out clean.
As donuts are baking, combine additional sugar and cinnamon; set aside.
Remove donuts from the oven. Sprinkle evenly with the cinnamon and sugar mixture while donuts are warm. Let slightly cool before removing from the pan.
Keywords: donuts, apple cider, baked donuts, dessert
This website uses cookies to improve your experience. We'll assume you're ok with this, but you can opt-out if you wish.AcceptRejectRead More
Privacy & Cookies Policy
Privacy Overview
This website uses cookies to improve your experience while you navigate through the website. Out of these, the cookies that are categorized as necessary are stored on your browser as they are essential for the working of basic functionalities of the website. We also use third-party cookies that help us analyze and understand how you use this website. These cookies will be stored in your browser only with your consent. You also have the option to opt-out of these cookies. But opting out of some of these cookies may affect your browsing experience.
Necessary cookies are absolutely essential for the website to function properly. This category only includes cookies that ensures basic functionalities and security features of the website. These cookies do not store any personal information.
Any cookies that may not be particularly necessary for the website to function and is used specifically to collect user personal data via analytics, ads, other embedded contents are termed as non-necessary cookies. It is mandatory to procure user consent prior to running these cookies on your website.